Create a Syncfusion® Blazor application
17 Nov 20257 minutes to read
Syncfusion® provides the Blazor Template Studio for Visual Studio Code, which scaffolds a Syncfusion® Blazor application preconfigured with Syncfusion® NuGet packages, namespaces, themes, and component render code. The Template Studio offers a guided wizard to create an application with Syncfusion® components.
NOTE
Blazor project templates from version
v17.4.0.39and later are supported by the Syncfusion Visual Studio Code project template.
Use the following steps to create Syncfusion® Blazor applications in Visual Studio Code:
To create a Syncfusion® Blazor application in Visual Studio Code, open the Command Palette withCtrl+Shift+P. Search for the wordSyncfusion® in the Visual Studio Code palette to get the templates provided by Syncfusion®.

SelectSyncfusion Blazor Template Studio: Launch, and pressEnter. The Template Studio wizard opens to configure the Syncfusion® Blazor app. Enter the project name and project path.

NOTE
For supported .NET SDK versions, see the .NET SDK support for Syncfusion Blazor components in the system requirementsdocumentation.
SelectNext or theProject type tab. The available Syncfusion® Blazor project types are displayed. Choose one based on the .NET SDK version in use.
.NET SDK version Supported Syncfusion® Blazor Application Type .NET 10.0,.NET 9.0,.NET 8.0 Syncfusion® Blazor Web App .NET 10.0,.NET 9.0,.NET 8.0 Syncfusion® Blazor WebAssembly App In theSyncfusion® Blazor Web App application type, the following options are available:
Interactivity type Server, WebAssembly, Auto (Server and WebAssembly) Interactivity location Global, Per page/component 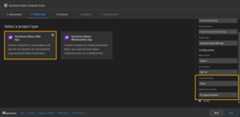
In theSyncfusion Blazor WebAssembly App project type, choose Progressive Web Application (PWA).

SelectNext or theControls tab, and then choose the Syncfusion® Blazor components to include in the application.

Choose the required control(s) by selecting the corresponding control tiles.
To unselect added control(s), use one of the following options:
Option 1: Click the corresponding selected control box.
Option 2: InProject Details, click the ‘x’ next to the corresponding control in the selected controls list.
NOTE
Choose at least one control to enable the Features and Configuration tabs.
SelectNext or theFeatures tab to view the available features for the selected controls, and choose the required options.

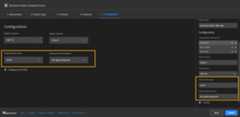
SelectNext or theConfiguration tab to open the Configuration section. Configure the target .NET version (.NET 10.0, .NET 9.0 or .NET 8.0), theme, HTTPS configuration, localization, authentication type, and options specific to Blazor Web App or Blazor WebAssembly App types.
Depending on the selected Syncfusion® Blazor application type, the following authentication options are supported:
Syncfusion® Blazor Application Type Supported Authentication Types Syncfusion® Blazor Web App None, Individual Accounts Syncfusion® Blazor WebAssembly App None, Individual Accounts, Microsoft Identity Platform For theBlazor Web App application type, Interactivity type and Interactivity location can be customized.
For theBlazor WebAssembly App application type, the Progressive Web Application option can be enabled or disabled.

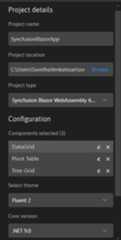
Project details section
Use the Project Details section to change the application type, remove selected control(s), or update configuration options.
ClickCreate. The Syncfusion® Blazor application is created with the required Syncfusion® NuGet packages, styles, and the render code for the selected Syncfusion® components.
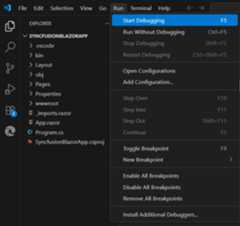
Run the application to view the Syncfusion® components. PressF5 or selectRun > Start Debugging.
The Syncfusion® Blazor application configures with most recent Syncfusion® Blazor NuGet packages version, selected style, namespaces, selected authentication, and component render code for Syncfusion® components.
If you installed the trial setup or NuGet packages from nuget.org you must register the Syncfusion® license key to your application since Syncfusion® introduced the licensing system from 2018 Volume 2 (v16.2.0.41) Essential Studio® release. Navigate to thehelp topic to generate and register the Syncfusion® license key to your application. Refer to thisUG topic for understanding the licensing details in Essential Studio® for Blazor.
Syncfusion® integration
The Syncfusion® Blazor application configures with latest Syncfusion® Blazor NuGet packages, styles, namespaces, and component render code for Syncfusion® components are added in the created application.
NuGet packages
TheSyncfusion.Blazor package is added as a dependency for all project types.

Style
The selected theme is added from the Syncfusion® NuGet package and referenced at the following locations.
| Application type | File location |
|---|---|
| Syncfusion® Blazor Web App | ~/Components/App.razor |
| Syncfusion® Blazor WebAssembly App (ASP.NET Core hosted) Syncfusion® Blazor WebAssembly App (Progressive Web Application) | {Client Project location}/wwwroot/index.html |
| Syncfusion® Blazor WebAssembly App | {Project location}/wwwroot/index.html |

Namespaces
The Syncfusion® Blazor namespaces are added in the_imports.razor file.

Component render code
The Syncfusion Blazor Calendar, Button, and DataGrid component render code is added to the Razor files in the Pages folder.
| File name | Code snippet added |
|---|---|
~/Pages/Home.razor or Index.razor |  |
~/Pages/Counter.razor |  |
~/Pages/FetchData.razor |  |
[8]ページ先頭