ESP8266WiFi library
ESP8266 is all about Wi-Fi. If you are eager to connect your new ESP8266 module to Wi-Fi network to start sending and receiving data, this is a good place to start. If you are looking for more in depth details of how to program specific Wi-Fi networking functionality, you are also in the right place.
Introduction
TheWi-Fi library for ESP8266 has been developed basing onESP8266 SDK, using naming convention and overall functionality philosophy ofArduino WiFi library. Over time the wealth Wi-Fi features ported from ESP9266 SDK toesp8266 /Adruino outgrowArduino WiFi library and it became apparent that we need to provide separate documentation on what is new and extra.
This documentation will walk you through several classes, methods and properties ofESP8266WiFi library. If you are new to C++ and Arduino, don’t worry. We will start from general concepts and then move to detailed description of members of each particular class including usage examples.
The scope of functionality offered byESP8266WiFi library is quite extensive and therefore this description has been broken up into separate documents marked with :arrow_right:.
Quick Start
Hopefully you are already familiar how to loadBlink.ino sketch to ESP8266 module and get the LED blinking. If not, please checkthis tutorial by Adafruit oranother great tutorial developed by Sparkfun.
To hook up ESP module to Wi-Fi (like hooking up a mobile phone to a hot spot), you need just couple of lines of code:
#include <ESP8266WiFi.h>voidsetup(){Serial.begin(115200);Serial.println();WiFi.begin("network-name","pass-to-network");Serial.print("Connecting");while(WiFi.status()!=WL_CONNECTED){delay(500);Serial.print(".");}Serial.println();Serial.print("Connected, IP address: ");Serial.println(WiFi.localIP());}voidloop(){}
In the lineWiFi.begin("network-name","pass-to-network") replacenetwork-name andpass-to-network with name and password to the Wi-Fi network you like to connect. Then upload this sketch to ESP module and open serial monitor. You should see something like:

alt text
How does it work? In the first line of sketch#include<ESP8266WiFi.h> we are includingESP8266WiFi library. This library provides ESP8266 specific Wi-Fi routines we are calling to connect to network.
Actual connection to Wi-Fi is initialized by calling:
WiFi.begin("network-name","pass-to-network");
Connection process can take couple of seconds and we are checking for this to complete in the following loop:
while(WiFi.status()!=WL_CONNECTED){delay(500);Serial.print(".");}
Thewhile() loop will keep looping whileWiFi.status() is other thanWL_CONNECTED. The loop will exit only if the status changes toWL_CONNECTED.
The last line will then print out IP address assigned to ESP module byDHCP:
Serial.println(WiFi.localIP());
If you don’t see the last line but just more and more dots........., then likely name or password to the Wi-Fi network in sketch is entered incorrectly. Verify name and password by connecting from scratch to this Wi-Fi a PC or a mobile phone.
Note: if connection is established, and then lost for some reason, ESP will automatically reconnect to last used access point once it is again back on-line. This will be done automatically by Wi-Fi library, without any user intervention.
That’s all you need to connect ESP8266 to Wi-Fi. In the following chapters we will explain what cool things can be done by ESP once connected.
Who is Who
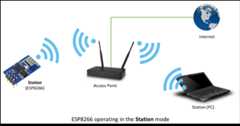
Devices that connect to Wi-Fi network are called stations (STA). Connection to Wi-Fi is provided by an access point (AP), that acts as a hub for one or more stations. The access point on the other end is connected to a wired network. An access point is usually integrated with a router to provide access from Wi-Fi network to the internet. Each access point is recognized by a SSID (ServiceSetIDentifier), that essentially is the name of network you select when connecting a device (station) to the Wi-Fi.
ESP8266 module can operate as a station, so we can connect it to the Wi-Fi network. It can also operate as a soft access point (soft-AP), to establish its own Wi-Fi network. Therefore we can connect other stations to such ESP module. ESP8266 is also able to operate both in station and soft access point mode. This provides possibility of building e.g.mesh networks.

alt text
TheESP8266WiFi library provides wide collection of C++methods (functions) andproperties to configure and operate an ESP8266 module in station and / or soft access point mode. They are described in the following chapters.
Class Description
TheESP8266WiFi library is broken up into several classes. In most of cases, when writing the code, user is not concerned with this classification. We are using it to break up description of this library into more manageable pieces.

alt text
Chapters below describe all function calls (methods andproperties in C++ terms) listed in particular classes ofESP8266WiFi. Description is illustrated with application examples and code snippets to show how to use functions in practice. Most of this information is broken up into separate documents. Please follow to access them.
Station
Station (STA) mode is used to get ESP module connected to a Wi-Fi network established by an access point.
alt text
Station class has several features to facilitate management of Wi-Fi connection. In case the connection is lost, ESP8266 will automatically reconnect to the last used access point, once it is again available. The same happens on module reboot. This is possible since ESP is saving credentials to last used access point in flash (non-volatile) memory. Using the saved data ESP will also reconnect if sketch has been changed but code does not alter the Wi-Fi mode or credentials.
Check out separate section withexamples.
Soft Access Point
Anaccess point (AP) is a device that provides access to Wi-Fi network to other devices (stations)and connects them further to a wired network. ESP8266 can provide similar functionality except it does not have interface to a wired network. Such mode of operation is called soft access point (soft-AP). The maximum number of stations connected to the soft-AP is five.

alt text
The soft-AP mode is often used and an intermediate step before connecting ESP to a Wi-Fi in a station mode. This is when SSID and password to such network is not known upfront. ESP first boots in soft-AP mode, so we can connect to it using a laptop or a mobile phone. Then we are able to provide credentials to the target network. Once done ESP is switched to the station mode and can connect to the target Wi-Fi.
Another handy application of soft-AP mode is to set upmesh networks. ESP can operate in both soft-AP and Station mode so it can act as a node of a mesh network.
Soft Access Point Class documentation
Check out separate section withexamples.
Scan
To connect a mobile phone to a hot spot, you typically open Wi-Fi settings app, list available networks and pick the hot spot you need. Then enter a password (or not) and you are in. You can do the same with ESP. Functionality of scanning for, and listing of available networks in range is implemented by the Scan Class.
Check out separate section withexamples.
Client
The Client class createsclients that can access services provided byservers in order to send, receive and process data.

alt text
Check out separate section withexamples /list of functions
Client Secure
The Client Secure is an extension ofClient Class where connection and data exchange with servers is done using asecure protocol. It supportsTLS 1.1. TheTLS 1.2 is not supported.

alt text
Secure applications have additional memory (and processing) overhead due to the need to run cryptography algorithms. The stronger the certificate’s key, the more overhead is needed. In practice it is not possible to run more than a single secure client at a time. The problem concerns RAM memory we can not add, the flash memory size is usually not the issue. If you like to learn howclient secure library has been developed, access to what servers have been tested, and how memory limitations have been overcame, read fascinating issue report#43.
Check out separate section withexamples /list of functions
Server
The Server Class createsservers that provide functionality to other programs or devices, calledclients.

alt text
Clients connect to sever to send and receive data and access provided functionality.
Check out separate section withexamples /list of functions.
UDP
The UDP Class enables theUser Datagram Protocol (UDP) messages to be sent and received. The UDP uses a simple “fire and forget” transmission model with no guarantee of delivery, ordering, or duplicate protection. UDP provides checksums for data integrity, and port numbers for addressing different functions at the source and destination of the datagram.
Check out separate section withexamples /list of functions.
Generic
There are several functions offered by ESP8266’sSDK and not present inArduino WiFi library. If such function does not fit into one of classes discussed above, it will likely be in Generic Class. Among them is handler to manage Wi-Fi events like connection, disconnection or obtaining an IP, Wi-Fi mode changes, functions to manage module sleep mode, hostname to an IP address resolution, etc.
Check out separate section withexamples /list of functions.
Diagnostics
There are several techniques available to diagnose and troubleshoot issues with getting connected to Wi-Fi and keeping connection alive.
Check Return Codes
Almost each function described in chapters above returns some diagnostic information.
Such diagnostic may be provided as a simpleboolean typetrue'orfalse` to indicate operation result. You may check this result as described in examples, for instance:
Serial.printf("Wi-Fi mode set to WIFI_STA %s\n", WiFi.mode(WIFI_STA) ? "" : "Failed!");Some functions provide more than just a binary status information. A good example isWiFi.status().
Serial.printf("Connection status:%d\n",WiFi.status());
This function returns following codes to describe what is going on with Wi-Fi connection:
- 0 :
WL_IDLE_STATUSwhen Wi-Fi is in process of changing between statuses - 1 :
WL_NO_SSID_AVAILin case configured SSID cannot be reached - 3 :
WL_CONNECTEDafter successful connection is established - 4 :
WL_CONNECT_FAILEDif password is incorrect - 6 :
WL_DISCONNECTEDif module is not configured in station mode
It is a good practice to display and check information returned by functions. Application development and troubleshooting will be easier with that.
Use printDiag
There is a specific function available to print out key Wi-Fi diagnostic information:
WiFi.printDiag(Serial);
A sample output of this function looks as follows:
Mode: STA+APPHY mode: NChannel: 11AP id: 0Status: 5Auto connect: 1SSID (10): sensor-netPassphrase (12): 123!$#0&*esPBSSID set: 0
Use this function to provide snapshot of Wi-Fi status in these parts of application code, that you suspect may be failing.
Enable Wi-Fi Diagnostic
By default the diagnostic output from Wi-Fi libraries is disabled when you callSerial.begin. To enable debug output again, callSerial.setDebugOutput(true). To redirect debug output toSerial1 instead, callSerial1.setDebugOutput(true). For additional details regarding diagnostics using serial ports please refer tothe documentation.
Below is an example of output for sample sketch discussed inQuick Start above withSerial.setDebugOutput(true):
Connectingscandonestate:0->2(b0)state:2->3(0)state:3->5(10)add0aid1cntconnectedwithsensor-net,channel6dhcpclientstart...chg_B1:-40...ip:192.168.1.10,mask:255.255.255.0,gw:192.168.1.9.Connected,IPaddress:192.168.1.10
The same sketch withoutSerial.setDebugOutput(true) will print out only the following:
Connecting....Connected,IPaddress:192.168.1.10
Enable Debugging in IDE
Arduino IDE provides convenient method toenable debugging for specific libraries.
What’s Inside?
If you like to analyze in detail what is inside of the ESP8266WiFi library, go directly to theESP8266WiFi folder of esp8266 / Arduino repository on the GitHub.
To make the analysis easier, rather than looking into individual header or source files, use one of free tools to automatically generate documentation. The class index in chapterClass Description above has been prepared in no time using greatDoxygen, that is the de facto standard tool for generating documentation from annotated C++ sources.
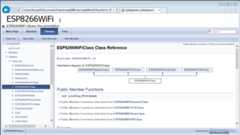
alt text
The tool crawls through all header and source files collecting information from formatted comment blocks. If developer of particular class annotated the code, you will see it like in examples below.

alt text

alt text
If code is not annotated, you will still see the function prototype including types of arguments, and can use provided links to jump straight to the source code to check it out on your own. Doxygen provides really excellent navigation between members of library.

alt text
Several classes ofESP8266WiFi are not annotated. When preparing this document,Doxygen has been tremendous help to quickly navigate through almost 30 files that make this library.