- General
- File Format
- Other Pandoc Options
- Appendix
General
Quick Usage of Export
Typora supports exporting the current document into PDF, HTML, HTML (without styles) and the Image format.
More formats (like Word, RTF, etc) are supported viapandoc. After you haveinstalled pandoc, these formats are supported in Typora.
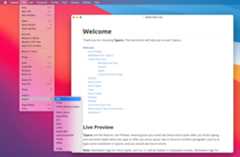
You can access the export command fromFile →Export in the menubar:
Export with Previous Settings
You can export the current file again using the most recent previous successful export command by clickingFile →Export →Export with Previous in the menubar.
If you want to export and overwrite a previously exported file using the most recent export command and newer file content, you can clickFile →Export →Export and Overwrite with Previous. One use case is that you may have exported the current Markdown file into a PDF file, but then you find some content is missing or some words are misspelled, after you correct the content of the Markdown file, instead of clickingPDF export and choosing the exported path again, you can just clickExport and Overwrite with Previous so that the newer content will be written to your previously exported PDF file.Please be careful since it will overwrite your previously exported file.
All “previous settings” refer to previous exports executed in the current window and current document.
Open Export Settings
You can configure export options in the preferences panel:
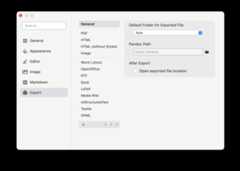
Export Location
You can change Typora’s default export location inExport →General →Default Folder for Exported File. Possible options are “auto”, “same folder with current folder” and “custom location”. This setting changes the default value and, when exporting, you can still change the exported file path in the save file dialog.
Export Using Pandoc
For formats other than HTML, PDF and Images, Typora usepandoc for exporting. Pandoc is also used for importing non-Markdown files such as .docx, .rtf, etc.
To make them work, pleaseinstall pandoc first. The quickest way is to follow their official instructions https://pandoc.org/installing.html.
After installation, please restart Typora. If Typora still says “Require Pandoc to Continue…”, please openExport →General from the preferences panel and manually configure the pandoc path.
Configure “After Export” Options
By default, when an export succeeds, Typora will show a notification. When an export fails, an error dialog with the relevent error message will pop up.
If you want to open the folder location of the exported file after exporting, you can check “Open exported file location” in the preferences panel. Settings in specific export commands will override settings in the “General” section for export.
If you want to open an exported file automatically, you can check “Open exported file” for specific export commands in the preferences panel.
Per-file Configurations
For supported configurations, you can define them in YAML front matters, please seeYAML front matters for details.
Since the Markdown file may be created by others, for security reasons, natively supported formats (PDF / HTML) require “Read and overwrite export settings from YAML front matters” to be enabled in the export preferences panel, then settings in YAML front matters can be used to overwrite global export settings.
Configure Export Items
Under theExport tab in the preferences panel, Typora allows you to customize your export items, including re-ordering, re-naming export items and adding and removing export items based on your needs. The changes will be applied to menu items under theFile →Export menu.
The built-in options (PDF, HTML, HTML (without Styles), Image) are not allowed to be reordered, renamed or removed. For other options, you can do:
Reorder Export Items
You can select one item in the list panel of the preferences panel →Export, then click on the ⬆︎ or ⬇︎ button to change the order.
Rename Export Item
You can select one item in the list panel of the preferences panel →Export, then click on the “Edit” button to rename one export item.
Remove Export Item
You can select one item in the list panel of the preferences panel →Export, then click on the “delete (-)” button to remove it from theFile →Export menu.
Add New Export Item
You can add export items based on Typora’s own exporter, pandoc, a custom command to extend Typora’s export function or just to add a preset export command into theexport menu. You can do this by:
Click the “add (+)” button in the list panel
Select a template from the dialog:

Set a name and configure its details.
Then you can use this from theFile →Export menu.
You could also assign it a shortcut key, by following - https://support.typora.io/Shortcut-Keys/#change-shortcut-keys.
File Format
HTML
You can selectExport →HTML from the preferences panel to configure export options for HTML files.
If you want to export an HTML file without styles, you should chooseExport→HTML (without styles), you will get a clean HTML file so you can add your own styles.
Outline
You can include an outline in exported HTML by enabling this option inExport →HTML from the preferences panel. Whether it is a collapsible outline or flat outline depends on your current setting. You can switch between them under theView menu or under theappearance section in the preferences panel.The CSS theme you use may effect the outline behavior in an exported file, so please disable this option if the outline in exported files do not work well in some 3rd party themes.
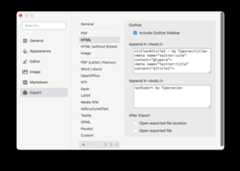
Add Custom Contents
You can add custom contents inAppend in <head /> andAppend in <body />, which will be inserted into the<head /> part and<body /> part in the exported HTML. For contents that cannot be added into<head />, even when it is added inAppend in <head />, it will be prepended into<body /> instead. The same goes forAppend in <body />.
Export YAML meta
Variables like${title} or${author} in<title> and<meta> tags will be replaced by correspondingvariables defined inYAML Front Matter.
For example, you can insert additional<meta> data or custom<style> into exported HTML using these options, e.g:
<metacharset="UTF-8"><metaname="author"content="${author}"><metaname="description"content="${description}">To use these variables somewhere else, you can add some javascript inAppend in <body />, to read the target meta tag and modify the export content as you want.
Append Contents per Document.
You could useappend-head andappend-body inYAML Front Matter to overwrite global settings, and / or addappend-head-extra andappend-body-extra to appendextra content besides content configured in the preferences panel. These settings require the “Read and overwrite export settings from YAML front matters” option to be enabled for the current HTML export item.
Change Theme
You can apply another theme for HTML export in the preferences panel. By default, the current theme will be used.
Example: Export usingVLOOK
VLOOK™ isTHEME PACK andENHANCEMENT PLUGIN for Typora, a cross-platform Markdown editor that targets exported HTML files.
By using it, you are able to export a more fancy HTML file. The following is a setup process based on current export functionalities:
- Step 1: Download and Configure
- Step 2: Install the Theme Package
- Step 3: Configure Export Options
See further details atInstall and Use VLOOK
Similarly, you can config your own export styles by changing all these settings.
More HTML Options
You can use more options, like setting up HTML templates, export to slides, etc by addingnew export commands based on Pandoc.
HTML (without styles)
You can export plain HTML (without styles) using the export commandExport →HTML (without styles) from the menu bar.
You can add your own CSS styles, content, or javascript by configuringAppend in <head /> andAppend in <body /> in the preference panel. The settings are the same as withadding custom content in HTML.
Image
Width and Font Size
Typora provides image export option for feeds in social media, so by default it has a 640px width with 24px font size. But you can change these in the preferences panel.
Also, based on the purpose of this feature, overall performance and the final size of output images, if the output article is too long, the image export would fail.
Image Quality
Image quality is used when you use a display with higher DPIs.
Auto: Typora will choose proper quality based on total image size.Medium: Medium quality.High: High qualityBest: The quality of “Best” is device dependent. If you are using a screen with high DPI, the original pixel width and height will be used. For example, if you are using a Retina display, then the exported image is also in Retina resolution.
They are translated into an algorithm-specific method that depends on the capabilities (CPU, GPU) of the underlying platform. It is possible for all three methods to be mapped to the same algorithm on a given platform.
Theme
You can choose another theme to be applied to exported images in the preferences panel → Export → Image. By default, the current theme will be used.
You can selectExport →PDF from the preferences panel to configure export options for PDF files. Provided options are:
Paper Size
Setpaper size (A4, A5, etc) orcustom size, andpage margins as shown below:

Theme
You can choose another theme to be applied for exported PDF’s in the preferences panel → Export → PDF. By default, the current theme will be used.
Please note that on the Windows / Linux version,only light themes are supported for PDF Export, as well as for print.
If you only want to make small changes,there’s no need to specify new themes for PDF export, you can simply add@media print { /* your css code */} inCustom CSS.
Page Break
When “Page Break Between Top Headings” is enabled, a page break will be inserted between sections divided by top level headings (h1). Also, a page break will be inserted before footnote definitions.
Note: You can input<div></div> in your document tomanually add a page break at that position.
Header / Footer
Headers and Footers are the text on top of or at the bottom of each page in an exported PDF (see screenshot below).
You can add a custom header and footer in an exported PDF. For example, you can set${title} - ${author} as the header andNo. ${pageNo} / ${pageCount} as the footer, the exported PDF would look like this:

You candownload the sample PDF here.
Note: Please leave enough margin when you want to append a page header or footer.
Note: You can also set per-document headers / footers usingYAML Front Matter after enabling the “Read and overwrite export settings from YAML front matters” option in the Settings panel under Export -> PDF. Sample YAML front matters is like:
---header:footer:Written in Typora---For md files containing the above YAML Font Matter, the header will be empty and the footer will be “Written in Typora” in the exported PDF file.
PDF Metadata
You can add metadata to an exported PDF file viaYAML Front Matter. The following shows the supported PDF metadata:
---title: Export in Typoraauthor: John Snowcreator: Typora inc.subject: Tutorialkeywords: [Pandoc, Tutorial, Export]---Note: when “keywords” is absent, Typora will also use “tags” and you can use a list with the same space indent in YAML to represent an array, for instance:
---tags: - Pandoc - Tutorial - Export---Output is:

Add Custom Content (PDF)
The PDF version is rendered from the HTML output, you can add HTML content (including scripts) in preferences panel → PDF → Append Extra Content, which will be appended in the<body> tag when rendering generated HTML into a PDF.
Example: Add Cover Page
It can be done by adding custom HTML contents into theAppend Extra Content field. A simple case may be using the following content:
<metaname="title"content="${title}"><divid='_export_cover'style="height:100vh;"><divid='_export_title'style="margin-top: 25%;text-align: center;font-size: 3rem;"></div></div><script>var$cover=document.querySelector("#_export_cover");vartitle=document.querySelector("meta[name='title']").getAttribute("content");if(!title||title=="${title}"){// no title$cover.remove();}else{document.body.insertBefore($cover,document.body.childNodes[0])$cover.querySelector("#_export_title").textContent=title;}</script>Another option is to use LaTex / Pandoc to generate a PDF, you can see details below.
PDF (LaTeX / Pandoc)
Typora also supports the generation of PDF files using Pandoc and LaTeX (or other engines). By default, there is no such option in the export menu but you can add this by:
- Open the
Exportsection in the preferences panel. - Click the “Add” button on the the export item list, select “PDF (LaTeX / Pandoc)” from the template selector, and click “OK”.
PDF Engine
Pandoc provides several engines for producing PDF files, including pdflatex, lualatex, xelatex, latexmk, tectonic, wkhtmltopdf, weasyprint, prince, context, and pdfroff. You will need to install one of these engines, and add it to your PATH, or specify the full path of the engine. You can config this in the preferences panel.
Please refer to https://pandoc.org/MANUAL.html#option–pdf-engine for details.
Note: On macOS, you could installMacTeX, open/Applications/TeX/Docs and Spell Utilities/Documents/What Is Installed.pdf to check where binaries are installed to. On Intel macOS, the path forpdflatex after installing MacTeX-2020 might be/usr/local/texlive/2020/bin/x86_64-darwin/pdftex.
Template
You can also specify template options in the preferences panel. For detailed explanations, please refer to thepandoc manual.
One example template with a “Cover Page” can be foundhere.
Meta Data (Other Options)
You can add meta data or extra options inYAML Front Matter, please checkhttps://pandoc.org/MANUAL.html#variables-for-latex for details and it supports extra options including margins, paper size, font family, etc.
For example, if you select LaTeX as the PDF engine, you can add a footer and header via:
---header-includes:|\usepackage{fancyhdr}\pagestyle{fancy}\fancyhead[CO,CE]{This is fancy}\fancyfoot[CO,CE]{So is this}\fancyfoot[LE,RO]{\thepage}---Extra Arguments
You can append extra command line arguments for pandoc. For arguments you can use, please refer to https://pandoc.org/MANUAL.html.
Word (.docx)
You can export to a Word file viaExport →Word (.docx) from the menu bar. You can configure it fromExport →Word (.docx) in the preferences panel.
Style Reference
For example, you can downloadthis sample reference doc file, then select this file in the preferences panel for the option “Style Reference”.
To create your own style template for docx output, you can generate one from the command line. (https://pandoc.org/MANUAL.html#option--reference-doc)
pandoc -o custom-reference.docx --print-default-data-file reference.docx.Then open custom-reference.docx in Word, modify the styles as you wish and save the file. For best results, do not make changes to this file other than modifying the styles used by pandoc.
You can read more detailshere.
Math Numbering Support.
Currently\label and\ref in math block is not supported when export to docx (seehttps://github.com/jgm/pandoc/issues/7774). One workaround is to installpandoc-tex-numbering and use-F pandoc-tex-numbering as parameter when export to docx.
OpenOffice (.odt)
You can export to an OpenOffice file viaExport →OpenOffice from the menu bar. You can configure it fromExport →OpenOffice in the preferences panel.
Template
You can find details in thepandoc manual. You can download the sample templatedefault.opendocument from https://github.com/jgm/pandoc-templates.
RTF
RTF (Rich Text Format) is the format saved by TextEdit.app or WordPad.exe. You can export to an RTF file viaExport →RTF from the menu bar. You can configure it fromExport →RTF in the preferences panel.
Epub
You can export to an EPUB file viaExport →Epub from the menu bar. You can configure it fromExport →Epub in the preferences panel.
Custom CSS
You can set custom CSS from the preferences panel. If you don’t know how to do this, you can check https://github.com/mattharrison/epub-css-starter-kit to make your own css style.
Chapter Level in Outline
Specify the number of section levels to include in the table of contents. The default is 3 (which means that level-1, 2, and 3 headings will be listed in the contents).
Cover Image
If you want to define a cover image for epub output, please add acover-image: ${path} inYAML Front Matter. If it starts with./ Typora will convert it to an absolute path relative to the current md file, otherwise it should be an absolute path or pandoc will try to find one in itsdata-dir.
Meta Data
You can useYAML Front Matter to set meta data on the output epub file, for example:
---title:My Booksubtitle:An investigation of metadatacreator:Sarah Jonesidentifier:doi:10.234234.234/33publisher:My Pressrights:© 2007 John Smith, CC BY-NCibooks:version:1.3.4---You can findmore detail here.
LaTeX
Meta Data (Other Options)
Same as Meta Data for PDF (LaTeX / Pandoc), you can add meta data or extra options inYAML Front Matter. Please check https://pandoc.org/MANUAL.html#variables-for-latex.
Add Extra Content in LaTeX Header
You can useheader-includes orlatex_header orlatex_header_extra inYAML Front Matter.
For example:
---latex_header:|\usepackage[utf8]{inputenc}\usepackage[italian]{babel}\author{The Author}\date{2016}\title{The Title}\editor{The Editor}classoption:-twocolumn-landscape---Wiki
Media Wiki
You can export to an OpenOffice file viaExport →Media Wiki from the menu bar. You can configure it fromExport →Media Wiki in the preferences panel.
Other Wiki Format
Please refer toOther Formats Using Pandoc as you can use pandoc to convert Markdown files into other wiki formats.
reStructuredText (RST, ReST, or reST)
You can export to an OpenOffice file viaExport →reStructuredText from the menu bar. You can configure it fromExport →reStructuredText in the preferences panel.
Textile
You can export to an OpenOffice file viaExport →Textile from the menu bar. You can configure it fromExport →Textile in the preferences panel.
OPML
You can export to an OpenOffice file viaExport →OPML from the menu bar. You can configure it fromExport →OPML in the preferences panel.
Presentation (RevealJS)
You can do this by followingOther Formats Using Pandoc.
For more detailed instructions, the community posts an instruction here →Using Typora to create presentations.
Other Markdown Spec
You can followOther Formats Using Pandoc to add new export targets using the template “Markdown (Other Spec)”. For details you cancheck here.

You could also change options for the exported Markdown file, including line wrap, line width, indent, unicode, etc.
Please note that “export” is not “reformat”, it will “represent” the same stuff but its literal content may changed. For example:
[linke][typora][typora]:http://www.typora.ioMay become the following content after export.
[linke](http://www.typora.io)You can setline width,end of line,indent,only allow unicode characters, andother options as export configurations.
Other Formats / Configurations Using Pandoc
Hint: You can check the pandocdocuments andexamples about how to use pandoc and configure the export.
If you want to export the current document to a format that pandoc supports but is not included in Typora’s export menu, you can configure one such option in the preferences panel.
The following is an example of providing a RevealJS export option based on a customized pandoc export option:

To start with, please add one export command choosing the “Pandoc” template, then add configurations based on your demands.
Target Format
You can leave this field empty as pandoc will convert your document based on the exported filename. For example, if you export toMyName.docx then pandoc will export the document to the Word format automatically.
You could also specify a format, for possible options, please refer tohttps://pandoc.org/MANUAL.html#option--to.
Target File Extension
When exporting, Typora will pop up a save panel asking where to save the exported file. Please use this setting to set the preferred file extensions or leave it empty when no preferred file extensions are required. You can use whitespace as a separator, for example:
.latex .texRaw Type
For syntax that pandoc does not support natively, Typora may use raw type as a workaround.
For example, the native data model in pandoc cannot represent[toc] since there’s no corresponding block type in pandoc. In this case, if you set the raw type as media wiki, Typora will use__TOC__ syntax when exporting or, if the raw type is set as latex, Typora will use\\tableofcontents.
Usually the raw type and target format should be the same, as well as for HTML-based formats such as Markdown, RevealJS, etc.
Also, please note that the “Export” function cannot export all styles even when raw type is set.
Extra Arguments
Get Exported AST for Pandoc
To ensure the parse rule is the same in Typora’s Markdown and the output by pandoc, Typora will first convert into pandoc AST (Abstract Syntax Tree) saving innative format (see native underhttps://pandoc.org/MANUAL.html#option--from) and then export to the target format. You can get the native file by selecting “native” as the target format in one custom pandoc export option.
Other Formats Using Custom Commands
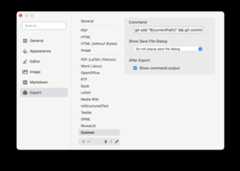
You can also add export options based on command line commands. You will need to configure:
Command
The command you want to trigger for this export option. For example, to submit the current file to a git server, you can usegit add "${currentPath}" && git commit -m "save" && git push. The${variable} in this option will be replaced byvariables defined in YAML front matter.
The command will be executed at the location of the folder of the current file.
Show Save File Dialog
You can change this setting to tell Typora if it needs to pop up a save file dialog, or pop up a folder select dialog, or no output path is required.
Target File Extensions
WhenSelect file path to save is selected in “Show Save File Dialog”, you can use this field to identify which file extensions are allowed for the exported file target.
Show Command Output after Export
Besides theOpen exported file location andOpen exported file, for export option based on custom commands, Typora also provides aShow command output option. When enabled, Typora will display a dialog that contains the command output (fromstdout). Even it is not enabled, when an export fails, the error message from the command line will always be shown.
Other Pandoc Options
Append Extra Arguments
For pandoc-based export items, besides the options we put in the preferences panel, you can also use all the available command line arguments inhttps://pandoc.org/MANUAL.html by appending them in the “Extra Arguments” field. For words like${value}, they will be replaced byvariables defined in YAML front matter.

How to export with special configuration / needs?
If configurations and examples explained in this page still cannot fit your needs, you can simply search Google with the keyword pandoc and your special needs, then fill the pandoc arguments or templates into Typora’s export panel asother formats / configs using pandoc orother formats using custom commands explained.
Appendix
Install Pandoc
Please refer toinstall pandoc.
Variables
You can use${variables} in custom header / footer text and custom export commands, their values are:
| Key | Value |
|---|---|
${outputPath} | Output file path after export. For example, if you export to location/User/aaa/Documents/test.pdf, then${outputPath} will be replaced with that path. |
${outputFileName} | File name (without extension) of the exported file. It will betest in the above case. |
${outputFileFullName} | File name (with extension) of the exported file. It will betest.md in the above case. |
${currentPath} | Path of the currently edited file. For example, if you are editing/User/aaa/Document/readme.md, then the value will be/User/aaa/Document/readme.md. |
${currentFileName} | Filename without extension of the currently edited file. It will bereadme in the above case. |
${currentFileFullName} | Filename with extension of the currently edited file. It will bereadme.md in the above case. |
${currentFolder} | Path of the parent folder of the current file. |
${today} | Current date, for example:2020-01-19 |
${pageNo} | Current page number. Only available for PDF format. |
${pageCount} /${totalPages} | Total page counts. Only available for PDF format. |
${title} | Article title, should be defined inYAML Front Matter. |
${author} | Article author, defined in export options for PDF format, can be overwritten inYAML Front Matter. |
${a.b} | Ifa is an object defined inYAML Front Matter which containsb, then you can usea.b to access the value forb. |
| Other variables | You can usekeyword: value inYAML Front Matter, then uses${keyword} variables in export configurations. |
Unset Variables
For example, if in the preferences panel, “Author” is configured, you can “unset” this by usingauthor: '’ in YAML.
Use Variables in Export Config
You can use${variables} in custom header / footer text and custom export commands.
Please note that if you use${variables} in a custom command line, Typora may remove quotes ('") inside it and wrap it with quotes to avoid insecure commands.
You can also use them incustom contents (append-head,append-body, etc). To avoid XSS, only variables in the<meta> tag will be replaced but you can use your javascript to read them from the<meta> tag and append to where you want them.
Trouble Shooting
Require Pandoc to Continue…
This usually happens when pandoc is not installed or Typora cannot detect the pandoc path, please try the following:
- Install pandoc
- Restart Typora after pandoc is newly installed.
- If still not working, manually set the pandoc path in
Export→Generalfrom the preferences panel.
Export PDF not working on Windows
- Open Start.
- Search for Services and click the top result to open the console.
- Search for “Print Spooler” and start it, then click Apply and OK

Seehttps://github.com/typora/typora-issues/issues/3766.
“Cannot Read Native” when exporting using pandoc
This is usually a bug in Typora, please report it to us using[email protected] with a sample.md file, information like which pandoc version you are using, target export format, and other necessary export configs.
Other Pandoc Errors
When an export failed, the error dialog will show the pandoc command line parameters and error message. You can copy the parameters, replace “-f native” with the Markdown file path and then input them in CMD (command line) or Terminal to test without Typora.
Whitespace or line breaks are gone in exported PDF
This relates to Markdown’s spec for whitespace and line break. You can change it using preferences inMarkdown →Whitespace / Line Break →Export / Print to enable “Preserve whitespace and single line break” when exporting. For details, please checkWhitespace and Line Breaks in Typora.
Env: node: No such file or directory
If you use a custom command likenode xxx, please make surenode is in your systemPATH. Or you can specify the node command with its full path. You can find your node path by inputtingwhich node orwhere node in your shell to locate the node bin location.