Uh oh!
There was an error while loading.Please reload this page.
- Notifications
You must be signed in to change notification settings - Fork13
Application example built with Angular 14 and hosted on Amazon S3 (Simple Storage Service) using GitHub Actions.
License
rodrigokamada/angular-github-actions-amazon-s3
Folders and files
| Name | Name | Last commit message | Last commit date | |
|---|---|---|---|---|
Repository files navigation
Application example built withAngular 14 and hosted onAmazon S3 (Simple Storage Service) usingGitHub Actions.
This tutorial was posted on myblog in portuguese and on theDEV Community in english.

Before you start, you need to install and configure the tools:
1. Let's create and configure the account. Access the sitehttps://aws.amazon.com/s3/ and click on the buttonGet Started with Amazon S3.

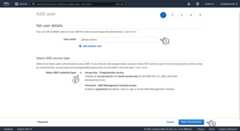
2. Click on the optionRoot user, fill in the fieldRoot user email address and click on the buttonNext.

Note:
- If you don't have an Amazon account, do steps 1 to 9 of the postAuthentication using the Amazon Cognito to an Angular application in the sessionCreate and configure the account on the Amazon Cognito.
3. Fill in the fieldSecurity check and click on the buttonSubmit.

4. Fill in the fieldPassword and click on the buttonSign in.

5. Click on the buttonCreate bucket.

6. Fill in the fieldBucket name, click on the optionBlock all public access to uncheck this option,I acknowledge that the current settings might result in this bucket and the objects within becoming public. and click on the buttonCreate bucket.

7. Click on the linkangular-github-actions-amazon-s3 with the bucket name.

8. Click on the linkProperties.

9. Click on the buttonEdit.

10. Click on the optionsEnable,Host a static website, fill in the fieldsIndex document,Error document - optional and click on the buttonSave changes.

11. Copy the URL and the region displayed, in my case, the URLhttp://angular-github-actions-amazon-s3.s3-website-sa-east-1.amazonaws.com and the regionsa-east-1 were displayed because the URL will used to access the Angular application and the region will used in the GitHub Actions file setting and click on the linkPermissions.

12. Click on the buttonEdit.

13. Fill in the fieldsPolicy with the content below and click on the buttonSave changes.
{"Version":"2012-10-17","Statement": [ {"Sid":"PublicRead","Principal":"*","Effect":"Allow","Action": ["s3:GetObject" ],"Resource": ["arn:aws:s3:::angular-github-actions-amazon-s3/*" ] } ]}
14. Ready! Account created and configured and bucket created and configured.

15. Click on the menuServices,Security, Identity & Compliance andIAM.

16. Click on the linkUsers.

17. Click on the buttonAdd users.

18. Fill in the fieldUser name, click on the optionAccess key - Programmatic access and click on the buttonNext: Permissions.
19. Click on the optionsAttach existing policies directly,AmazonS3FullAccess and click on the buttonNext: Tags.

20. Click on the buttonNext: Review.

21. Click on the buttonCreate user.

22. Copy theAccess key ID displayed, in my case, theAccess key IDAKIAUAM34QRRRQ5AZD2A was displayed, click on the linkShow, copy theSecret Access key displayed because theAccess key ID andSecret Access key will be configured in the GitHub repository and click on the buttonClose.

23. Ready! Access keys created.
1. Let's create the account and the repository. Do steps 1 to 6 of the postHosting an Angular application on GitHub Pages using GitHub Actions in the sessionCreate and configure the account on the GitHub.
2. Click on the menuSettings.

3. Click on the side menuSecrets.

4. Click on the buttonNew repository secret.

5. Fill in the fieldsName,Value and click on the buttonAdd secret to configure the key with theAccess key ID.

6. Click on the buttonNew repository secret.

7. Fill in the fieldsName,Value and click on the buttonAdd secret to configure the key with theSecret Access key.

8. Ready! Access keys configured.

1. Let's create the application with the Angular base structure using the@angular/cli with the route file and the SCSS style format.
ng new angular-github-actions-amazon-s3--routing true--style scssCREATE angular-github-actions-amazon-s3/README.md (1074 bytes)CREATE angular-github-actions-amazon-s3/.editorconfig (274 bytes)CREATE angular-github-actions-amazon-s3/.gitignore (548 bytes)CREATE angular-github-actions-amazon-s3/angular.json (3363 bytes)CREATE angular-github-actions-amazon-s3/package.json (1096 bytes)CREATE angular-github-actions-amazon-s3/tsconfig.json (863 bytes)CREATE angular-github-actions-amazon-s3/.browserslistrc (600 bytes)CREATE angular-github-actions-amazon-s3/karma.conf.js (1449 bytes)CREATE angular-github-actions-amazon-s3/tsconfig.app.json (287 bytes)CREATE angular-github-actions-amazon-s3/tsconfig.spec.json (333 bytes)CREATE angular-github-actions-amazon-s3/.vscode/extensions.json (130 bytes)CREATE angular-github-actions-amazon-s3/.vscode/launch.json (474 bytes)CREATE angular-github-actions-amazon-s3/.vscode/tasks.json (938 bytes)CREATE angular-github-actions-amazon-s3/src/favicon.ico (948 bytes)CREATE angular-github-actions-amazon-s3/src/index.html (314 bytes)CREATE angular-github-actions-amazon-s3/src/main.ts (372 bytes)CREATE angular-github-actions-amazon-s3/src/polyfills.ts (2338 bytes)CREATE angular-github-actions-amazon-s3/src/styles.scss (80 bytes)CREATE angular-github-actions-amazon-s3/src/test.ts (745 bytes)CREATE angular-github-actions-amazon-s3/src/assets/.gitkeep (0 bytes)CREATE angular-github-actions-amazon-s3/src/environments/environment.prod.ts (51 bytes)CREATE angular-github-actions-amazon-s3/src/environments/environment.ts (658 bytes)CREATE angular-github-actions-amazon-s3/src/app/app-routing.module.ts (245 bytes)CREATE angular-github-actions-amazon-s3/src/app/app.module.ts (393 bytes)CREATE angular-github-actions-amazon-s3/src/app/app.component.scss (0 bytes)CREATE angular-github-actions-amazon-s3/src/app/app.component.html (23364 bytes)CREATE angular-github-actions-amazon-s3/src/app/app.component.spec.ts (1151 bytes)CREATE angular-github-actions-amazon-s3/src/app/app.component.ts (237 bytes)✔ Packages installed successfully. Successfully initialized git.
2. Change thepackage.json file and add the scripts below.
"build:prod":"ng build --configuration production","test:headless":"ng test --watch=false --browsers=ChromeHeadless"
3. Run the test with the command below.
npm run test:headless> angular-github-actions-amazon-s3@1.0.0 test:headless> ng test--watch=false--browsers=ChromeHeadless⠙ Generating browser application bundles (phase: setup)...2201202222:11:29.773:INFO [karma-server]: Karma v6.3.11 server started at http://localhost:9876/2201202222:11:29.774:INFO [launcher]: Launching browsers ChromeHeadless with concurrency unlimited2201202222:11:29.781:INFO [launcher]: Starting browser ChromeHeadless✔ Browser application bundle generation complete.2201202222:11:37.472:INFO [ChromeHeadless97.0.4692.71 (Linux x86_64)]: Connected on socket 2NkcZwzLS5MNuDnMAAAB with id98670702Chrome Headless97.0.4692.71 (Linux x86_64): Executed3 of3 SUCCESS (0.117 secs/0.1 secs)TOTAL:3 SUCCESS
4. Run the application with the command below. Access the URLhttp://localhost:4200/ and check if the application is working.
npm start> angular-github-actions-amazon-s3@1.0.0 start> ng serve✔ Browser application bundle generation complete.Initial Chunk Files| Names| Raw Sizevendor.js| vendor|2.00 MB| polyfills.js| polyfills|339.24 kB| styles.css, styles.js| styles|213.01 kB| main.js| main|53.27 kB| runtime.js| runtime|6.90 kB|| Initial Total|2.60 MBBuild at:2022-01-23T01:13:06.355Z- Hash: e7a502736b12e783- Time: 6256ms** Angular Live Development Server is listening on localhost:4200, open your browser on http://localhost:4200/**✔ Compiled successfully.
5. Build the application with the command below.
npm run build:prod> angular-github-actions-amazon-s3@1.0.0 build:prod> ng build--configuration production✔ Browser application bundle generation complete.✔ Copying assets complete.✔ Index html generation complete.Initial Chunk Files| Names| Raw Size| Estimated Transfer Sizemain.464c3a39ed8b2eb2.js| main|206.10 kB|56.11 kBpolyfills.f007c874370f7293.js| polyfills|36.27 kB|11.56 kBruntime.8db60f242f6b0a2b.js| runtime|1.09 kB|603 bytesstyles.ef46db3751d8e999.css| styles|0 bytes|-| Initial Total|243.46 kB|68.25 kBBuild at:2022-01-23T01:14:01.354Z- Hash: cab5f3f1681e58fd- Time: 11304ms
6. Let's create and configure the file with the GitHub Actions flow. Create the.github/workflows/gh-pages.yml file.
mkdir-p .github/workflowstouch .github/workflows/gh-pages.yml
7. Configure the.github/workflows/gh-pages.yml file with the content below.
name:GitHub Pageson:push:branches: -mainjobs:deploy:runs-on:ubuntu-lateststeps: -name:Configure AWS Credentialsuses:aws-actions/configure-aws-credentials@v1with:aws-access-key-id:${{ secrets.AWS_ACCESS_KEY_ID }}aws-secret-access-key:${{ secrets.AWS_SECRET_ACCESS_KEY }}aws-region:sa-east-1 -name:Checkoutuses:actions/checkout@v2 -name:Setup Node.jsuses:actions/setup-node@v2with:node-version:16 -name:Install dependenciesrun:npm install -name:Run testsrun:npm run test:headless -name:Buildrun:npm run build:prod -name:Deployif:success()run:aws s3 sync ./dist/angular-github-actions-amazon-s3 s3://angular-github-actions-amazon-s3
Notes:
- The
aws-access-key-idandaws-secret-access-keysettings were done in the GitHub repository. - The
aws-regionsetting is the bucket region. - The
./dist/angular-github-actions-amazon-s3setting is the application build folder. - The
s3://angular-github-actions-amazon-s3setting is the bucket name.
8. Syncronize the application on the GitHub repository that was created.

9. Ready! After synchronizing the application on the GitHub repository, the GitHub Actions build the application and synchronize with Amazon S3 bucket. Access the URLhttp://angular-github-actions-amazon-s3.s3-website-sa-east-1.amazonaws.com/ and check if the application is working. Replace the URL values with your bucket name and region.
1. Let's validate the run of the GitHub Actions flow. Access the repositoryhttps://github.com/rodrigokamada/angular-github-actions-amazon-s3 created and click on the linkActions.

2. Click on the flow runned.

3. Click on the jobdeploy.

4. Click on each step to validate the run.

5. Ready! We validate the run of the GitHub Actions flow.
1. Clone the repository.
git clone git@github.com:rodrigokamada/angular-github-actions-amazon-s3.git
2. Install the dependencies.
npm ci
3. Run the application.
npm start
About
Application example built with Angular 14 and hosted on Amazon S3 (Simple Storage Service) using GitHub Actions.
Topics
Resources
License
Uh oh!
There was an error while loading.Please reload this page.
Stars
Watchers
Forks
Releases
Sponsor this project
Uh oh!
There was an error while loading.Please reload this page.