- Notifications
You must be signed in to change notification settings - Fork16
Generate a Classic Mac interface in your browser
License
robbiebyrd/classicy
Folders and files
| Name | Name | Last commit message | Last commit date | |
|---|---|---|---|---|
Repository files navigation
A UI framework using native CSS/JS replications of the Mac OS 8.1 interface components.
Just curious? Visit our website to learn more.
The Classicy components are created in React. For demo purposes, we provide a very basic Next.js app for testing.
You will need Node.js v20.11 or higher. You will also need theyarn package manager.
Clone this repo to your local computer and change into the folder
git clone https://github.com/robbiebyrd/classicycd classicyInstall the necessary dependencies.
yarn
Modify the .env file to the below and make sure it is loaded.'''NEXT_PUBLIC_BASE_PATH=""'''
Start the Classicy Destkop server in development mode.
yarn dev
Open your web browser tohttp://localhost:3000 .
To view the Classicy UI Components, run the Storybook Development server.
yarn storybook
- New Dawn by
Nathanael Gentry - Scrollbars of the Classic Mac OS by
Jessica Stokes (@ticky) after-dark-css, for the basic System 7.1.1 interfaceflyer, for further inspiration- Robin Casady, for releasing ChicagoFLF into the public domain
- Apple, who maintains the copyright on the background patterns, icons and interface components
Legend
| ✅ | ℹ️ | |
| Complete | Partially complete. | Experimental |
| Subject to change |
- Desktop
- ℹ️ The ubiquitous Finder
- Menubar
- ✅ System Menu
- ℹ️App Switcher
- Does not currently switch apps on click
- ✅ Widgets
- ℹ️Date/Time
- Need to create Control Panel widget to adjust settings
- ℹ️Date/Time
- Icons
- ✅ App Shortcuts
- ✅ Cleanup
- Arrange By…
- Sounds
- ✅ Sound Provider
- ✅ Load sound theme from JSON
- ✅ Audio Sprites support
- ℹ️ Sound Manager Control Panel
⚠️ Sound Event Handler- NOTE: This is under development and subject to change.
- ✅ Event dispatcher/player
- Automatic event intercept and play for known events (map audio sprites to events)
- Appearance Manager Control Panel (Theme Manager)
- ℹ️ Appearance Manager Control Panel
- Currently, does not allow creating custom themes, but can switch between loaded themes
- ✅ System
- ✅ Load theme from JSON
- ✅ System events for modifying theme
- UI
- ✅ Typography settings
- ✅ Measurement settings
- ✅ Desktop settings
- ✅ System colors
- ✅ Configurable color variables
- ✅ Color Theme-able components
- ℹ️ Appearance Manager Control Panel
- App Template
⚠️ App Context/Event Handler- App Switcher
- Window
- Controls
- ✅ Zoom
- ✅ Resize
- ✅ Collapse
- ✅ Close
- Placard
- ✅ Header
- Dialog
- Modal
- Dialog
- ✅ Movable
- Non-movable
- Alert
- Movable
- Non-movable
- Dialog
- ✅ Modeless
- Modal
- ✅ Standard
- Controls
- System
⚠️ File System⚠️ Integrated into Finder.app
- UI Components
- ✅ Text Input
- ✅ Text Area
- ✅ Button
- Tabs
- ✅ Radio Button
- ✅ Drop-down menu
- Multi-select menu
- ✅ Checkbox
- ✅ Bevel Button
- Slider
- Spinner
- Date/Time Picker
- ✅ Expandable (Disclosure)
- ✅ Fieldset
- ✅ Separator
- ✅ Progress
- Menu
- ✅ Contextual Menu
- Submenu
- Gallery Picker (Slider)
- Color Picker
<ClassicyDesktopProvider><ClassicyDesktop><ClassicyDesktopMenuBar><ClassicyDesktopIcon?><YourClassicyApp><ClassicyAppContext><ClassicyApp><ClassicyWindow?><ClassicyUIControls?><OtherReactNodes?>
ClassicyDesktopClassicyDesktopClickClassicyDesktopDrag
ClassicySoundPlayClassicyAlertSosumiClassicyAlertWildEepClassicyAlertndigoClassicyBeepClassicyBootClassicyButtonClickDownClassicyButtonClickUpClassicyInputRadioClickDownClassicyInputRadioClickUpClassicyMenuCloseClassicyMenuItemClickClassicyMenuItemHoverClassicyMenuOpenClassicyWindowCloseClassicyWindowCollapseClassicyWindowControlClickDownClassicyWindowControlClickUpClassicyWindowExpandClassicyWindowFocusClassicyWindowMoveIdleClassicyWindowMoveMovingClassicyWindowMoveStopClassicyWindowOpenClassicyWindowResizeIdleClassicyWindowResizeResizingClassicyWindowResizeStopClassicyWindowZoomMaximizeClassicyWindowZoomMinimize
ClassicyDesktopIconClassicyDesktopClickClassicyDesktopAltClickClassicyDesktopDoubleClickClassicyDesktopDrag
ClassicyAppClassicyAppOpenClassicyAppCloseClassicyAppHideClassicyAppFocus
ClassicyWindowClassicyWindowOpenClassicyWindowCloseClassicyWindowZoomClassicyWindowCollapseClassicyWindowResizeClassicyWindowDragClassicyWindowFocusClassicyWindowContentScrollClassicyWindowContentClick
ClassicyMenuClassicyMenuHoverClassicyMenuClickClassicyMenuChange
My first real job was working in the pre-production department of my local newspaper. During the afternoons, I wouldtypeset press releases and public notices. But, in the evenings, up until the legally-allowed time for a 15-year-old toremain on the clock, I would transform the digital PDF pages of some 15+ publications, sent in over modem, ontophotographic film. I would take the processed negatives, sometimes 20 feet in length before being cut to newsprint size,and blast them with ultraviolet light, projecting an eerie purple glow onto aluminum plates. After a sufficient searing,I would wash the plates with harsh chemicals and dry them with blasts of nitrogen, and then they would be screwed ontothe humungous web-fed printing presses.
It still seems crazy that anyone would allow a teenager to handle dangerous chemicals, stick their hands in giant metalstamping presses, and once I turned 16, drive across seven counties, unsupervised, in a gigantic panel van. I hardlyever betrayed that trust; in fact, I tried to treat my job like it was a privilege. Except for the one time I slipped ina fake obituary (so I could show my professor and get out of a 8:15 a.m. exam the next day) I was an exemplary employee.
I loved it all: the photography labs, the huge presses 20 feet tall, the massive ImageSetter that printed, not ontopaper, but onto photographic film. Still, my favorite part of that job were the Macs. My school had once been loaned afew Macintosh Classic IIs for a month, and I had found myself sneaking back into the classroom and spending as much timeas possible in front of them. When the loan was revoked, I turned to solace in the remaining Apple II in the corner thatnobody else cared to use.
I had desperately wanted a Mac, but the reasoning of the time was against me: Apple was not doing well, and software inretail stores was difficult to come by. Windows 3.1 was the dominant force, and Windows 95 promised to revolutionize thePC experience by making it equivalent with MacOS.
So, when I got my job at the newspaper, which ran exclusively on Macs, I relished every second with my darlings. I wouldspend late nights there, sometimes attempting to learn Pascal, but mostly poking and prodding at every button, settingand Preferences file I could find. Sometimes, on Saturdays, with little to do between deadlines, my supervisor would letme invite my friends over. The four of us, spread between the four blazing-fast PowerMac G3s in the office, would playDoom or Quake until the final newspaper of the day would submit its morning edition at 2 am.
I grew to love my MacOS machines, and as I transitioned my love of newspapers from high school job to early career, Iwas delighted to find I got to use my Mac every single day. I would even drag an iMac from work to home every evening,presuambly so that I could “do work,” but really because I just loved the MacOS experience. My aged PC monstrosity inthe corner was largely ignored. I certainly did not have the money to buy a new Mac, but carting a Bondi Blue beautyback-and-forth from work would do just fine: especially since it had a handle.
That’s not to say it was all sunshine and rainbows: in fact, MacOS Classic was awful. It wasn’t truly a multitaskingoperating system, it had terrible memory management, and, in an effort to support the 6800 CPU, could in fact force theoperating system to run in 24-bit mode. The whole thing was insanity, and you simultaneously ran more than oneapplication at your own peril.
The problems of MacOS were not new; in fact, DOS and Windows (up until Windows XP) had largely similar problems. It wasApple’s lack of real, usable solutions, however, that caused MacOS to linger while Windows thrived. Apple abandoned itsown development platform, MacApp, with MacOS 7, and instead third-party tools were the only available developmentplatforms on the Mac. Apple tried to make parternships with other companies, like Symantec, to make developer tools, butultimately mis-management and corporate animosity ended these arrangements quickly.
It’s easy to get confused, as Apple has changed the name they use to refer to the Macintosh’s operating system. Here’s aquick table of the name’s evolution:
| OS Name | Version(s) | Release Date(s) | Notes |
|---|---|---|---|
| Macintosh System Software | 1.0-3.0 | January 1984-January 1986 | Original OS shipped with the Mac |
| System Software 1.0 | 3.1-3.4 | February 1986-June 1986 | |
| System Software 2.0-2.0.1 | 4.0-4.1 | January 1987 | |
| System Software 5 | 5.0-5.1 | October 1987 | |
| System Software 6 | April 1988-March 1992 | ||
| System 7 | 7.0-7.5.5 | August 1992-September 1996 | The first MacOS version to support multitasking. |
| MacOS 7 | 7.6-7.6.1 | January 7, 1997-April 7, 1997 | |
| MacOS 8 | 8-8.6 | July 26, 1997-May 10, 1999 | Introduced the Platinum appearance theme and Appearance Manager. |
| MacOS 9 | 9.0-9.2.2 | October 23, 1999-December 5, 2001 | Mostly released as a compatibility layer for the transition to the new MacOS X. |
After MacOS X gained traction, and eventually developers ported their ‘Classic Compatibility Layer’ (or ‘Carbonized’)applications to the more modern and NeXT-based ‘Cocoa’ framework, Apple renamed all versions of MacOS before OS X 10 as“Classic” MacOS. Sometime in the late 2010s, apple began lowercasing the Mac when referring to its modern OS, stylizingitmacOS.
It had been some time since I used a MacOS Classic computer regularly. These days, I may occassioanlly need to open afile in QuarkXPress 3 or NewsEditPro from my days as a newspaper reporter; I even still remember all the keyboardshortcuts, it turns out. But, largely, I have forgotten this old and trusted friend.
I’ve used versions of Windows from 2 to 2022, OS/2 from 2 to Warp, BeOS, Netware, Irix, Solaris and every flavor ofLinux I can find. And, of course I stare every day at the latest incarnation of macOS. But, still, I love the visualfeel of Platinum, the name Apple gave to the UI in MacOS 8 and 9.
MacOS 8 was released in July of 1997, nearly four years after it was first announced as "Copland" in 1994. In reality,Copland had been in the works since 1988 as Project Pink, and involved a drama of epic proportions with all the majorcomputing titans of the time. System 7, the predecessor to MacOS 8, was aged--like, horribly aged. Apple, in financialtrouble, was concerned that the rise of Windows could spell the end of the Macintosh. It tried selling System 7 as areplacment operating system OS/2 to IBM, but the project named Taligent fizzled within 2 years. Internal development wasalmost at a standstill, and thecompany eventually looked outward.
BeOS, an alternative operating system for Apple and clone PowerPC computers, looked promising, but eventually Appleturned to Steve Jobs and his company NeXT. The NeXT OPENStep framework was already cross-compatible and mature, whileBeOS, while impressive, was new and had large gaps in functionality.
Steve Jobs, returned to his throne at Apple, decried that the remnants of Pink and Taligent would become MacOS 8 (andeventually MacOS 9), while the NeXT's UNIX-based operating system would become MacOS X (or 10). MacOS 8-9 were a bridgeto the future; while most of the litany of changes were foundational adds and performance tweaks, the new Platinum userinterface from Copland was introduced, which remained through the life of MacOS Classic (and, in fact, was the UI forthe first release of MacOS Rhapsody, the forefather of the modern macOS).
Since the release of the Hierarchical File System (or HFS) with the Macintosh Hard Disk 20 in 1985, files includedmultiple forks. All files contained a "data" fork, or the actual contents of the file; however every file could alsocontain a Resource Fork, or additional data store within the same file. A word processing document could, for instance,store the text contents within the data fork, and store any embedded images within the Resource fork of the file.Applications often used these Resource forks as well to store things like icons, images, patterns, sounds, colorpallettes, and tons of other metadata. It's sometimes quite amazing the raw resources available in these Resource forks.
I went about extracting these Resource forks to see what I could find.
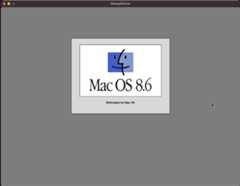
First, I downloaded the MacOS 8.6 install cd from the Internet Archive. I was sure I had done something wrong, though,when I double-clicked on the ISO file I downloaded: nothing happened. In fact, you have to useathird-party tool to mount HFS disks in modern macOS.Even then, I had trouble extracting the Resource Forks. So I decided it was time to return to my old friend.
I decided what I needed was an actual running version of MacOS 8. I first thing I tried was the veryawesomeMacintosh.js appfromfelixrieseberg, but ran into a few setbacks. First, the emulatedsystem is running a 68K processor, and therefore the maximum verison of MacOS those processors can run is 8.1. MacOSPlatinum hadn't quite been fleshed out until MacOS 8.5. Also, I had trouble extracting files with their Resource Forksintact (more on that later).
It then became necessary to take the more complex route and download MacOS 8 andinstallSheepShaver, which emulates a full PowerPC Mac. SheepShaverallows us to run all the way up to MacOS 9.0.4. I could have installed MacOS 9; however, very few UI changes took placebetween MacOS 8.6 and MacOS 9, and because the MacOS 8 interface guidelines are publicly documented, I've decided tofocus on 8.6.
Installing SheepShaver is easy, but getting it setup is a little more complicated. First, you need a MacOS ROM file. Itried anolder ROM file that contained the MacintoshToolbox, the part of the ROM that contained some UI specifics. But try as I might I could not extract any resources fromthe ROM file. I decided instead to use aNew World ROM, even though I waspretty sure the Macintosh Toolbox assets would not be included; I'd have to look inside the OS itself.
I placed the SheepShaver app, the MacOS ROM file in my Applications folder. I opened SheepShaver and went straight intothe settings, ignoring the failing boot. First I created a new Hard Drive disk, and added my Mac OS 8.6 Install CD ISOinto the window. Next, I made sure my ROM file was correct in the settings, and set my “Unix Root” to my home folder. Ichanged the RAM to 64 MB, and then switched to the Audio/Video tab to adjust my resolution and enable QuickDrawacceleration.
Then, in a strange example of a bad UI, I force-quit SheepShaver and re-opened, and then magically my new Mac began toboot.
I downloadedResForge, a Resource Fork editor, onto my Host Mac to get at themeat of the files. Resource forks contain a list of Resources, grouped by type. I started looking through the commonResource fork types I knew of.
| Name of resource type | actual name | Description |
|---|---|---|
| cicn | color icon | Defines a color icon used in data |
| clut | color look-up table | Defines a color palette used in data |
| CURS | cursor | Defines the shape of a monochrome cursor (8 × 8 bit square) |
| icl8 | 8-bit icon list | Defines an icon displayed in the Finder |
| icns | 32-bit icon list | Defines an icon displayed in the Finder |
| ICON | icon | Defines a monochrome item used in data |
| MooV | movie | Stores a QuickTime movie |
| PICT | picture | Stores a PICT image contained in the file |
| snd | sound | Stores a sound used in the file |
| styl | style | Defines style information, such as the font, color and size of text |
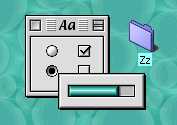
With MacOS 8 and the Platinum interface, also came the Appearance Manager, a sytem utility that allows you to tweak theinterface. While not fully documented and released until MacOS 8.5, the Appearance Manager could use theme files tochange the appearance of the system. And by change, I mean dramatically. Before Apple fully embraced the idea, I spenthours and hours usingKaleidoscope to craft the perfect desktopUI. Luckily, Apple created a theme file for it's default Platinum UI, allowing us to peruse the Resource fork for somejuicy UI morsels.
In theMacintosh HD: System Folder:Appearance:Theme Files is a filed namedApple platinum. I copied this folder frommy SheepShaver instance to my local machine and opened up Resforge to dive in. I also copied and opened up theAppearance Control Panel, found in theMacintosh HD:System Folder:Control Panels folder.
Also, found within those files, are these very nice and fun credits:
Apple Platinum
Designed by Pat Coleman, Jennifer Chaffee Special Thanks to Elizabeth Moller, Paula Brown, Don Lindsay, Lynn Shade andTakumi Takano
Appearance Manager
Does that Theme Switchin' Thang. ... Our Favorite Buildmeister (he's so cute): Robert Bowers
I don’t know who Robert Bowers is, but this is how I would want to be remembered in perpituity.
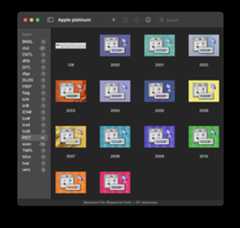
Theme Colors and Appearance Manager theme previews from Apple Platinum theme file and Appearance Manager Control Panel,opened in ResForge
I also copied over theMacintosh HD: System Folder:Appearance:Sound Sets:Platinum Sounds file and extracted all theawesome interface sounds from that file. MacOS 8 was awesome in that, not only could you provide a theme file for thevisual part of your experience, you could also load in a sound theme. This was definitely a devisive feature; as ayouth, all the clicks and clacks delighted me, but my older co-workers were adamantly against.
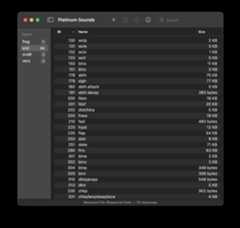
Interface Sounds Files from the Platinum Sound set
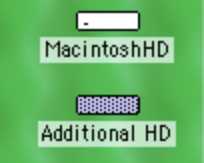
Other files with gold are the Macintosh HD:System Folder:System, Macintosh HD:System Folder:System Resources andMacintosh HD:System Folder:Finder have several resources we will need, such as cursors, icons and images.
I usedPermute from Setapp to do image and sound conversions; most of the images,patterns and icons will be exported as ICNS or TIFF, and the sound resources will be exported as AIFF. I chose MP3 asthe final audio format, though I may add support for multiple formats (such as OGG and M4A) at a later time.
I specifically chose PNG for icons because I needed support of the Alpha channel. MacOS icons on the desktop areoverlaid with a halftone pattern when opened; we needed the alpha channel so we could keep the shape of the icon whilealso overlaying the pattern.
A un-opened and opened Desktop Icon in MacOS 8. The system applies a halftone pattern to open application icons.
I also extracted the Chicago and Charcoal fonts, though I ended up using an open-source, re-rendered version of theChicago font.
While it was time consuming, it was still relatively simple to find the raw image and audio resources I needed toreplicate the interaface. What I didn't have were the "geometry" and "composition" of the windows: what color are thebordes? How are the window borders drawn?
While the Resource forks do contain some information on the geometry of UI elements, they are not exactly humanreadable—at least not using ResForge. I could have used a more specialized Resource fork editor, suchasResourcerer, which might have given me more options to extra UI datafrom system files. However, I wasn’t counting on this being the case.
I also attempted to decodeMacApp, the original Apple-supported developmentframework for MacOS Classic apps, in both its Pascal and C++ variants. However, I found the project had been abandonedfar before the Platinum user interface was introduced, so the results were not what I had hoped: I saw a lot of System 7interface components, but nothing specifically Platinum.
To my surprise, though, the Platinum interface that I had fallen in love with hadn't been entirely introduced in MacOS8: in fact, small bread crumbs had been left in later versions of System 7.

The System 7 Control Strip component, showing early hints of the upcoming Platinum interface.

A System 7 vs MacOS 8 Window. While different, there are visual similarities between the two.
I had little luck in finding any geometry information about the windows, so I decided to studytheApple Human Interface Guidelines for MacOS 8. Thereis a treasure trove of detailed UI schematics available, but the manual doesn't specify any colors or measurements forthe UI elements.

The Apple Platinum theme logo, hidden inside theApple platinum theme file's Resource fork.
Nearly all of the standard HTML elements are represented in the HIG: everything from buttons to fieldsets are presented.I started to jot down, in my notebook, all the different components and how they were related to one another: a Buttonwould contain text and, possibly, an image, while a Window would contain any number of other UI components. Before long,I had a pretty strong hiearchary of all the components and how they interacted.
There are a lot of very specific advisements in the HIG around proper element spacing and alignment; I made it a goal tobake these in where possible, but I also remembered that the goal of this project was to be a wrapper for anotherapplication. I can provide guides, but ultimately the developer will own the finished result.
There were also a few components I decided against making. The Control Strip, ubiquitius in MacOS as an easy way tochange system settings without switching to a Control Panel application, is not really suited for a web app. As well, Idecided against the Utility and Palette window styles, as I didn't see myself using them at the moment. I've tagged themas efforts for another day; we still have plenty left to do.
If I was going to rebuild the UI from scratch, I was definitely going to need some colors. I was pretty sure thatscreenshots of a running MacOS 8 system inside an emulator would not represent the color of Platinum accurately. Myinitial tests showed this to be true; I could get different values based on the ROM I used or the Video adapter tweaks Imade. The HIG didn't specify colors by value, but I hoped I could find them in a Resource fork somewhere.
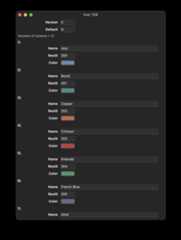
Luckily, I was, along with the colors of all the default color theme variants that came with MacOS 8. There were 7distinct shades of gray for the system interface, not including black and white. Things like window backgrounds, bordercolors and other common interface elements use these 7 shades of gray to draw the bulk of the interface.
In MacOS 8, elements like scroll bars, menu selections and text highlighting are given an additional "color" variationtheme. This gives the interface an additional layer of customization, without radically changing the entire UI. 20 colorvariations were included with MacOS 8.6; by default, the system used the "Lavender" color scheme.

Default themes shipped with MacOS 8.6: Default, Sunny, Bubbles and Golden Poppy.
And, to top it all off, you could combine a color variation, background image, system font and sound theme together tocreate your own custom Platinum theme. You could then save these themes and then switch between them. I often tookadvantage of this, creating a "Dark Mode" theme which helped a dark-room-adjacent server stop bleeding light onto mynegatives.
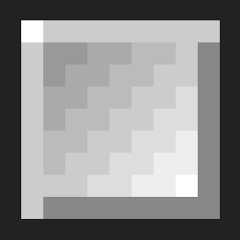
Each color variation is made up of 7 shades of color, ordered from darkest to brightest.
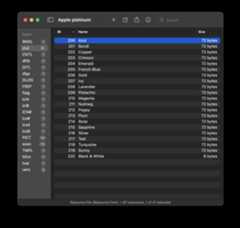
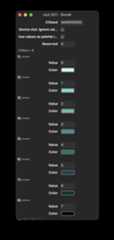
Apple Platinum theme file, and the colors for the Bondi theme, opened in ResForge
I extracted these colors, as well as a few background images I found in the theme file.
Then, I took a ton of screenshots. I installed as many late-model apps as I could find: I scoured the MacintoshRepository and the Internet Archive for Shareware CDs. I looked for a Hotline server archive, but alas I could not findone.
I focused a lot of my research on AppleWorks 6; while it seemed like an outlier in terms of design and didn't alwaysfollow Apple's own HIG, most of the system components were left unmodified. I used this app as a reference sketch forplotting out how I would componentize this entire UI later on.
It had all the components that I thought I would need. I made a list, checked against the HIG to see if I'd missedanything, and came up with the following:
- Desktop
- Desktop Menu Bar
- Images
- Context Menu
- Window
- Regular Window
- Modal Window
- Title Bar
- Control Boxes
- Close
- Zoom
- Collapse
- Resize
- Scoll Bars
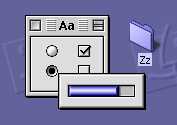
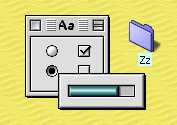
- UI Components
- Button
- Dropdown Menu
- Long variant, with values
- Short variant, with no values
- Checkbox
- Radio button
- Fieldset (control group)
- Progress
- Text Input
- Window
- Desktop Menu Bar
I'm sure there will be other components I want to add over time, but I felt like this was a good starting place.
I was pretty confident about my choices here, and I must admit it is only because I've been keeping a secret. This isn'tthe first time this has been done, and in fact, this isn't the first time that I've done this. Myprojecthttps://github.com/robbiebyrd/classicy was already in existence wellbefore I decided to revisit this topic again after 4 years.
I first created my version ofClassicy (as Platinum) in 2019 by forking theamazing workofnpjg and hishttps://github.com/npjg/classic.cssproject. I extended it as part ofmy project 9/11 Realtime and used it as atime-representative user interface.
The Classicy project was created using a mish-mash of CSS from several projects and a spaghetti-code mess of eventhandlers for controlling things like window resizes and closes. It has so far been starred 44 times and used in ahandful of post-grad student projects. It has been embarressing for me to connect with up-and-coming developers aroundthe world, trying to debug code I'm sure would deny them their well-earned degree.
Ever since, I've wished I could go back and start over with a modern framework. I had transitioned into backenddevelopment a few years before, so I had missed a lot of the fun involved with component-based design and, especially,the React framework. I decided it was time to re-teach myself how to front-end dev again, and this was the perfectproject to work on.
I spent a little time refreshing my consulting site,Space Hippo, and learning aboutReact's effect hook to make fun animations. Then I dove into state management and event reducers, and found soon Reactwas the perfect tool for a Platinum project revamp.
I sketched out the component structure as follows:
<ClassicyDesktop><ClassicyDesktopContext><AClassicyApp>: A Custom app<AppContextProvider><ClassicyDesktopIcon><ClassicyWindow><ClassicyUIComponents?><AnyOtherReactComponent>
I deliberated a lot over the nesting of components, and in the end hoped that this order would allow ClassicyApps to bemore easily packaged. I also hoped that putting a Window in charge of its own contents would not turn out to be amistake.
A React Context is a data structure that allows sharing state between components.
I also decided ultimately to wire up any ClassicyUIComponent that accepted some kind of input directly to theAppContext. This way, the app itself could keep an eye on the values of each component within each window, allowing onewindow to change the contents of another.
Finally, I decided to insert a ClassicyDesktopContext to hold all the system settings; specifically, I needed a placeto store the theme settings. While I eventually decided to use CSS variables to set theme colors throughout the entireapp, I still needed a place to stash Sound file resources, desktop background settings and font selections for thetheme. This allows me to change the theme from inside an App, and have that change copied over to all over ClassicyApps, Windows and UI Components. In fact, the app Appearance Manager that is included in the Classicy React project issimply a regular app that reports an Event when the theme is selected from a dropdown. I'll talk more about eventslater.
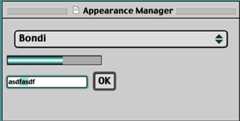
{"id":"bondi","name":"Bondi","color": {"outline":"#393939","select":"#DDD","highlight":"#AAA","window": {"border":"#000","borderOutset":"#FFF","borderInset":"#CCC","frame":"#CCC","title":"#000","document":"#FFF" },"black":"#000","white":"#FFF","alert":"#ffFF00","error":"#ff0000","system": ["#EEE","#DDD","#CCC","#AAA","#808080","#393939","#202020" ],"theme": ["#C8F8E9","#67DACD","#5AB9AD","#308F91","#0D716A","#00454B","#003333" ] },"sound": {"file":"/sounds/platinum/platinum.json","disabled": [] },"typography": {"ui":"\"Charcoal\",\"ChicagoFLF\",\"Geneva\", sans-serif","uiSize":"14px","header":"\"AppleGaramond\", serif","headerSize":"22px","body":"\"Geneva\", serif","bodySize":"14px" },"measurements": {"window": {"borderSize":"1px","controlSize":"12px","paddingSize":"6px","scrollbarSize":"20px" } },"desktop": {"iconSize":"48px","iconFontSize":"12px","backgroundImage":"url(/img/wallpapers/waves_bondi.png)","backgroundColor":"#00454B","repeat":"repeat","position":"center","size":"auto" }}The JSON contents of theBondi theme.
Now that I had my components defined, I sketched them out quickly, just for structure. There really wasn't much to them,but I needed a canvas to start working. I created a blank ClassicyDesktop, ClassicyDesktopIcon, ClassicyWindow andClassicyButton as a starting point, with no CSS. Then, I got to the hard, hard work.
I first sketched out the components of a "Platinum" style Window. I knew that this would be my most complicatedcomponent, so Ihoped sketching it out would also help me identify pieces I could break down into smaller components, as well as get anidea of the types of events and states I would need.

I mocked up each of these components in HTML, and created a bare React component that returned a div for each of thepieces I sketched out above (sans the scrollbars). I also thought about all the different states and props I would needto react to as a Window, and typed those up, too.
| Name | Type | Required | Description |
|---|---|---|---|
| id | str | Yes | The ID of the window |
| appId | str | Yes | The ID of the ClassicyApp that the window belongs to. All windows must belong to an App (though, not all Apps must have Windows). |
| title | str | No | The Title Text to display in the windows's Title bar. |
| icon | str | No | The Icon to show in the Title bar. |
| hidden | bool | No | Whether the window is hidden or not. |
| closable | bool | No | Whether the window can be closed by clicking the Close button. When false, the Close box is hidden. |
| zoomable | bool | No | Whether the window can be zoomed by clicking the Zoom button. When false, the Zoom box is hidden. |
| collapsable | bool | No | Whether the window can be collapsed and expanded by clicking the Collapse button. When false, the Collapse box is hidden. |
| resizable | bool | No | Whether the window can be resized by clicking and dragging the Window resizer in the bottom-right of the window. |
| scrollable | bool | No | Whether the window's inner contents can be scrolled, or whether any overflow should be hidden. |
| modalWindow | bool | No | Whether the window is Modal or not. Modal windows have a different inner content style. |
| initialSize | [w,h] | No | The initial size of the window. |
| initialPosition | [x,y] | No | The initial screen position of the window. |
| appMenu | [] | No | When a window takes focus, it can change the contents of the Desktop Menu. This holds any custom menu items that should be visible when the window is open. |
| contextMenuItems | [] | No | When a user right-clicks within a window, a Context Menu is shown. This holds the contents of that context menu. |
| children | any | No | Any contents for the inside of the window. |
I implemented a simple state for the ClassicyWindow component, and added it in. I then connected all the props in andthen realized while what I had was functional, it was really ugly. It was time to get to the difficult work of CSStheming.
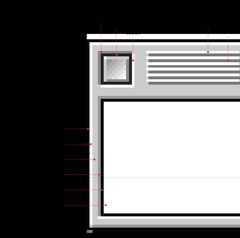
As I started zooming into the PDF version of the Apple HIG, I noticed patterns start to emerge: all the window borders,both out and inset, were consistent throughout. The width of borders were consistent, as were the padding betweenelements. It was also easy to see that, where there were variations, they were slight--and they were also repeated. Welldone, Apple.
I was able to make a list of common sizes, and a hierarchy of element boders using the CSS propertiesborderandbox-shadow.
An overview of the outlines that make up a ClassicyWindow.
I notcied that there were some pretty hard-and-fast measurements: borders were 1px, and the padding between the outerwindow chrome and the inner window contents was 4px. This same 4px spacing also showed up in the title bar: the spacingbetween the top of the window and the components of the Window's title bar are 4px.
I picked a few sensible defaults for things like Desktop Icon sizes and UI font sizes, and created a bunch of CSSVariables to hold all the values. Then, once I was happy with the default look-and-feel, I took the colors I hadextracted from the Appearance theme file earlier, and was able to easily switch between color themes by updating the CSSvariables. It was so easy I thought maybe I had done something wrong at first, but it actually worked. I was even ableto change fonts for the UI with just a property update.
The measurements were harder. In some places I had usedem values; in others, I had usedpx. This mish-mash ofmeasurements really made weird visual errors hard to track down. Finally, I decided on a set of arithmetic standardsbased on the window border, window padding size and window control size. Using these three measurements and theCSScalc() function, I was able to get a tighter grip on the visual style. It also made things so much easier as Icontinued to add components, as I had already established a good measurement system and ratios that were consistentthroughout.
I created a shared SASS module that created CSS classes for all the themes, so that updating the ClassicyDesktopcomponent's class name would update all the child components. I created a SASS array of color values for each colortheme; adding additional color or system themes is as easy as creating a new class and changing a few input variables totheappearanceManagerTheme mixin function. Then, any Component needs only use CSS variables in their styling to takeadvantage of theme changes. A few helper functions for things like borders and bevels are also provided.
A few of the UI elements were tougher; the Platinum Windows's Control boxes, like the close and zoom button, have apixelated style I wanted to replicate. I could not find a way to do this with only CSS, so instead I created an SVG anduse it as an overlay to create the same effect.
The Platinum theme Windows control buttons, like the close button, have a unique, pixel-gradient overlay.
A few other elements, like the collapse and zoom buttons, also required an extra SVG overlay. Thankfully, using the CSSpsuedo-selectors::before and::after , I was able to overlay both the pixelated gradient and the inner control SVG.
Quite possibly, the component I am most proud of is the HTML Progress element. Using the entire specture of seven colorsin each color theme, I was able to nearly replicate one of the few beautiful parts of the Mac OS 8 Platinum experience.Compared to the progress indicators in System 7, this splash of color was a generational leap. It feels silly to typetoday, but it was true at the time.
Now that I was able to make individual windows and components, I needed a way for the entire system to interact. Amulti-window environment is not very user-friendly if the Windows are fighting for control and focus. In fact, it tookme quite a while to wrap my head around all the things that were involved in basic window management.
I needed to provide some basic system settings to all components: specifically, the color and sound themes. I alsoneeded to provide a place to store which ClassicyApp was active, which Window was active, and a place to store all theitems in the Desktop Menu Bar, which will be shared by all Apps and Windows.
I chose to let the ClassicyDesktop component control which Window was currently active, and ClassicyApps and Windowscould request a window become active by firing an event. At first, I fell unwittingly into a hole known as "propdrilling" by others, by passing large data structures as props through components. Most of the time, I was only passingthem so they would be available to child components. At first, this kind of made sense, because as a backend developer,the idea of dependency injection is a real, but often ignored, pain. After too long of this, it became clear that I hadthis all wrong. I took a week away from the project, and started doing every tutorial I could find dealing with complexstate and event reducers in React.
After my break and fresh insight, I rewrote the ClassicyDesktop component to use a shared context and an event reducer.I then did the same thing to the ClassicyWindow component. I typed up a list of events I would need to react to.
| EventName | Description |
|---|---|
ClassicyWindowOpen | Fired when a window opens. |
ClassicyWindowClose | Fired when a window closes. |
ClassicyWindowResize | Fired when a user clicks the resizer (RSZR) element in the bottom-right corner. No resizing actually begins until theClassicyWindowMove method is fired. |
ClassicyWindowDrag | Fired when a user clicks on the Window Title. No dragging of the window actually occurs until theClassicyWindowMove method is fired. |
ClassicyWindowMove | Fired when the mouse is moving within the window. If theClassicyWindowDrag orClassicyWindowResize events have been fired, then moving the window will either drag or resize the move in response to the mouse's movement. |
ClassicyWindowStop | Fired when either aClassicyWindowResize orClassicyWindowDrag has finished. |
ClassicyWindowFocus | Fired when the user clicks within the area of the window. Clicking the title bar, contents or outside frame of a window will cause it to become the highlighted window, and all other windows will lose focus. |
ClassicyWindowContentScroll | Fired when a user scrolls the window contents container. |
ClassicyWindowContentClick | Fired when a user clicks within the window contents area. |
ClassicyWindowContextMenu | Fired when a user right-clicks within a window. Each window controls the contents of its own context menu. |
ClassicyWindowExpand | Fired when a user clicks the CLPSE button and the window is currently collapsed. Collapsing makes the height of the window only as tall as the Title bar, and hides the contents of the window. It is the MacOS 8 equivalent of "minizing" a window. |
ClassicyWindowCollapse | Fired when a user clicks the CLPSE button and the window is currently in an expanded state. |
ClassicyWindowZoom | Fired when a user clicks the ZOOM button. Clicking the Zoom button makes the current window as large as the current viewport. Clicking the ZOOM button again will return the window to its previous position. |
I also re-wrote the event handlers I had written for the Windows's control boxes, and took advantage of the eventdispatcher.
Next, I decided that the ClassicyDesktop could also control Opening and Closing ClassicyApps, which would in turncontrol its own windows. Opening a ClassicyApp also adds an entry to theappSwitcherMenu array, which keeps track ofall the open apps and displays them in the Appication Switcher, the top-right component of the Desktop Menu.
One of the other neat quirks of MacOS Classic and MacOS today is the top Desktop Menu Bar, whose contents changes basedon the current, active window. The Menu Bar is considered contextually relevant to the active window the user isinteracting with. This is in contrast to Windows TaskBar, which is contextually independent.
I decided to let windows attach a MenuBar to the event they fire when they become active, and let the ClassicyDesktopand ClassicyDesktopMenuBar components use that state to render the menu. This took some time for me to wrap my headaround, being somewhat a newbie again to React, but eventually it became so elegant that I have almost taken it forgranted.
I abstracted out as much even logic as possible into the deepest component I could. I knew that ClassicyWindow eventsmight need to bubble up to the ClassicyDesktop, but I also knew many ClassicyWindow events would need to go that high,and could stay within the Window itself. While the events are structuarlly the same, I decided to setup discrete eventdispatchers for components. I knew this means I would have to make two calls for some events.
For instance, to handle aClassicyWindowFocus event, first I need to notify the actual window it has been focused.This is important so that it could notify the windows' children of a change, and make any visual updates necessary, suchas applying a new "active" CSS class. Then, I need to let the ClassicyDesktop event handler also know the window wasbeen focused, so it can be set as the active window and raised to the top-most z-index. When handling this event in theClassicyWindow, I first dispatch a localClassicyWindowFocus to the Window's event dispatcher. Then, using the samepayload, I dispatch the sameClassicyWindowFocus event to the Desktop event dispatcher.
Finally, I felt like I had enough of staring at invidiual components, and it was time to put something together. Ithought it would be fun to build a tiny little web browser using one of my favoritesites,theoldnet.com.
I took a shot at building out a full App using the framework I'd setup. It looks something like below:
<ClassicyAppContext.Provider value={{appContext, setAppContext}}> <ClassicyDesktopIcon appId={appId} appName={appName} icon={appIcon}/> <ClassicyApp id={appId} name={appName} icon={appIcon} debug={true}> <ClassicyWindow id={"demo"} title={appName} appId={appId} closable={true} resizable={true} zoomable={true} collapsable={true}> <iframe src={"https://theoldnet.com/"} style={{width: "100%", height: "100%", padding: "0", margin: "0"}}/> </ClassicyWindow> </ClassicyApp></ClassicyAppContext.Provider>The JSX of a basic ClassicyApp using an iFrame to displaytheoldnet.com.
I turned on a built-in "Debugger" that simply shows another window with the current Desktop State and App Context.
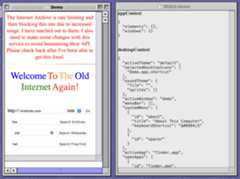
A Demo web browser, showing the app's Debugger window.
It worked! Obvisouly, I have some work to do with using iFrames, but it worked like a charm. I decided to see how easyit would be to build a quick app to change the Theme, and AppearanceManager was born! A little more tweaking, and I hada full Markdown editor usingMDXEditor.
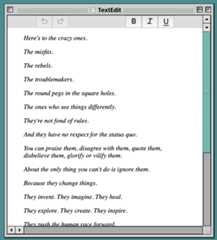
A SimpleText app, using the awesome MDXEditor, and the Demo ClassicyApp app, showing a few basic controls.
The current version of Classicy is 0.4.0, a pre-release demo showing the new outline for how the project will work goingforward. My plan is to continue releasing point releases until the system is in a full state for a 1.0 release.
I still don't have a list of the items that will make this a 1.0 release, but I'm hoping that by 0.5 we will have a moreformal release plan.
If you are interested in joining our development, I would love to have you! Feel free to shoot me an email atme@robbiebyrd.com or find me onLinkedIn.
About
Generate a Classic Mac interface in your browser