- Notifications
You must be signed in to change notification settings - Fork0
E-Paper Display based efficient NTP Clock
License
desiFish/EPaper-Display-NTP-Clock
Folders and files
| Name | Name | Last commit message | Last commit date | |
|---|---|---|---|---|
Repository files navigation
🚨IMPORTANT: Please read the [Notes & Warnings] section carefully before proceeding with this project. It contains crucial safety information about battery configuration, charging, and sensor placement.
| 🖥️ Core Components | |
|---|---|
| 🧠 Microcontroller | Xiao ESP32 C6 (Compatible with most ESP32 boards) |
| 📺 Display | Waveshare 3.52" BiColor (Black and White) E-paper (360x240) |
| 🔋 Power Source | LiFePO4 6000mAh 3.2V |
| ⚡ Power Specifications | |
|---|---|
| Operating Voltage | ~3.2V |
| Sleep Duration | ~60 seconds |
| Battery Thresholds | 📈 High: 3.4V 📉 Low: 2.9V |
| 🔌 Communication | |
|---|---|
| I2C Speed | 400kHz (Fast Mode) |
| NTP Server | asia.pool.ntp.org |
| Time Offset | 19800 (India, UTC+5:30) |
| ⚡️ Power Efficient | 🌙 Night Mode | 🔄 Auto Update | 📊 Battery Monitor |
| ~60s Deep Sleep | Light Sensor Based | Periodic NTP Sync | Voltage Tracking |
graph TD A[Wake Up] --> B{Check Light} B -->|Dark| C[Sleep Mode] B -->|Light| D[Update Display] D --> E{Battery OK?} E -->|Yes| F[Update Time] F --> G[Update Display] G --> H[Deep Sleep]Prerequisites
Required Libraries: -Check header section inside .ino file -OEM Display Libraries (Included in src)
Installation Steps
- Clone repository
- Configure WiFi:
constchar *ssid ="Your_SSID";constchar *password ="Your_PASSWORD";
- Update pins in
src/epdif.h - Upload code
📊 Battery Life Analysis - Test #1 (With ESP32 C3)
| Start Date | End Date | Runtime | Status |
| June 6, 2024 | November 1, 2024 | 4 months 27 days | ✅ Completed |
| Performance Metrics 🔋 Initial Voltage: 3.6V 📉 Final Voltage: ~2.84V 🌡️ Temperature Range: 17-38°C | |||
📊 Battery Life Analysis - Test #2 (With ESP32 C3)
| Start Date | End Date | Runtime | Status |
| November 1, 2024 | April 2, 2025 | 5 months 2 days | ✅ Completed |
| Performance Metrics 🔋 Initial Voltage: 3.6V 📉 Final Voltage: 2.79V 🌡️ Temperature Range: 15-36°C | |||
| 📊 Battery Life Analysis - Test #1 (With ESP32 C6) | |||
|---|---|---|---|
| Start Date | End Date | Runtime | Status |
| April 6, 2025 | TBD | TBD | TBD |
| Performance Metrics 🔋 Initial Voltage: 3.54V 📉 Final Voltage: TBD 🌡️ Temperature Range: TBD | |||
 Front 1 |  Side 1 |  Back |  Front 2 |
 Inside 1 |  Inside 2 |  New UI |  ESP32 C3 & C6 |
 New Sleep UI |  Inside 4 |  Inside 5 |  Inside 6 |
 Circuit Schematic | |||
Build Requirements
- 💻 Arduino IDE 2.3.x or newer (tested)
- 📦 ESP32 Board Support Package
- 🔧 USB-C cable for programming
- 📚 Required libraries (see Prerequisites)
Debug Tips
- 🔍 Serial Monitor: 115200 baud
- 📊 Test points available for voltage monitoring (just lift the cover)
- 📡 WiFi6 2.4GHz
- 🕒 NTP synchronization
- 💤 Auto sleep when dark
⚠️ Important Note: No single source provided a complete working solution for deep sleep with DS3231 RTC. This implementation combines key elements from multiple references to create a reliable solution.
The project implements an efficient deep sleep mode using the DS3231 RTC's external alarm feature. This approach significantly reduces power consumption while maintaining accurate timekeeping.
- The DS3231 RTC SQW pin is connected to GPIO7 (MTDO) (RTC GPIO)
- The RTC alarm triggers a signal on the SQW pin
- ESP32-C6 wakes up from deep sleep on the falling edge
- Wake-up Source:
esp_sleep_enable_ext0_wakeup(GPIO_NUM_7, 0) - Wake Up Interval: 60 seconds (configurable)
- Current Consumption: ~16µA in deep sleep (for XIAO ESP32C6 only)
These sources were combined to create a working implementation:
- ESP32 Wake-Up Using DS3231 RTC - Basic RTC alarm setup
- XIAO ESP32C6 Deep Sleep Guide - ESP32-C6 specific wake-up configuration
- ESP32 External Wake-Up Implementation - External wake-up pin handling

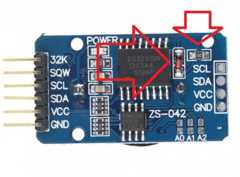
Most DS3231 modules are sold with CR2032 or similar cells which are not rechargeable. If you are using a non-rechargeable cell then **REMOVE** either the resistor or the diode marked in the above image.

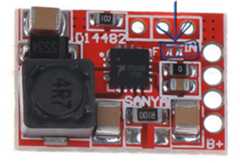
There are some misinformation over internet regarding the charging mode of TP5000. If you are going to use LiFePO4 cell with TP5000 then **DO NOT** short the above marked area with caption F.
- ⚡Current Draw: This project's extremely low current consumption (well below rated cell capacity) makes the cell configuration safer
- 🛡️Protection: Always use proper BMS protection for your cells
- 📝BMS Setup: Due to limited 1S LiFePO4 BMS availability:
- Using 4.2V BMS for 2.5V cutoff protection (Low Discharge Cutoff)
- TP5000 connected directly to the cell for proper 3.6V charging
- This is a temporary solution until better 1S LFP BMS options become available
- ⚡USB Connection Warning: Disconnect battery when connecting USB to ESP32C6 (Use a switch to cutt-off battery)
- XIAO modules are designed for LiPo/Li-ion batteries (4.2V charging)
- Not compatible with LFP battery charging (3.6V required)
- Connect USB-C module output to TP5000 input
- Detailed schematics will be provided later
- Simple setup despite complex explanation
- ✅Operating Range:
- All components work perfectly with LFP's lower voltage
- Tested operational down to 2.8V
- No impact on battery life or performance
- LFP cells maintain stable 3.2V for extended periods
- 6+ months of testing
- Components designed for wide voltage range operation
- 💨Ventilation Requirements:
- Proper air vents are crucial
- Ensures accurate sensor readings
- Prevents heat buildup
⚠️ Please consider these points carefully before replicating this setup. Battery safety is crucial!
GNU General Public License v3.0
This project is licensed under the GNU GPL v3.0 - see below for details:
- ✅ Commercial use
- ✅ Modification
- ✅ Distribution
- ✅ Patent use
- ✅ Private use
⚠️ Liability⚠️ Warranty- ℹ️ License and copyright notice required
- ℹ️ State changes
- ℹ️ Disclose source
- ℹ️ Same license
We welcome contributions! Here's how you can help:
- 🔍 Fork the repository
- 🌿 Create your feature branch (
git checkout -b feature/AmazingFeature) - 💾 Commit your changes (
git commit -m 'Add some AmazingFeature') - 🚀 Push to the branch (
git push origin feature/AmazingFeature) - 📝 Open a Pull Request
- ✅ Clear description of changes
- ✅ Test your changes thoroughly
- ✅ Update documentation if needed
- ✅ Follow existing code style
- ✅ Add comments where necessary
Made with ❤️ and ♻️ materials by 🌍 Earth-conscious developer
About
E-Paper Display based efficient NTP Clock
Topics
Resources
License
Uh oh!
There was an error while loading.Please reload this page.


