- Notifications
You must be signed in to change notification settings - Fork3
OneSignalDevelopers/onesignal-supabase-sample-integration-supabase
Folders and files
| Name | Name | Last commit message | Last commit date | |
|---|---|---|---|---|
Repository files navigation

OneSignal makes engaging customers simple and is the fastest, most reliable service to send push notifications, in-app messages, SMS, and emails.
This project demonstrates how to use OneSignal as an integration withSupabase to handle your messaging needs, including push notifications, SMS text messages, email, and in-app messaging. Feel free to use this sample as a reference for your own Supabase integration.
- OneSignal + Supabase Sample Omni-channel Integration-Table of Contents
- 🚦 Getting started
- Setup OneSignal App
- Setup Supabase Project
- 🚀🚀🚀 Launch Companion App
- ❤️ Developer Community
This project assumes that you already have a few things setup.
- An existing OneSignal account. If not,create one for free.
- A Supabase account and theSupabase CLIv1.16.0 installed.
- A Firebase account, if notcreate one first.
- A Stripe account and theStripe CLI v1.13.5 installed.
- A Vercel account and theVercel CLIv28.7.0 installed (or anything capable of hosting a Next.js API).
- A working Flutter dev environment and access to a mac for iOS-specific steps.
- Deno v1.28.0 installed andconfigured.
- From the OneSignal Dashboard, selectNew App/Website to create an app.

- Name app and choose theAndroid platform to setup.
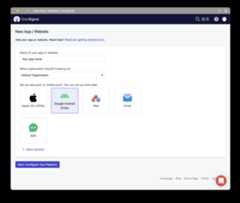
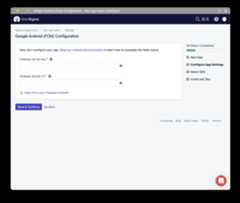
- Enter FCM credentials for the Firebase project you want to handle Android notifications and chooseSave & Continue.


iOS configuration requires substantially more effort to integrate due to needing signed certs from Apple. Due to this fact, followthis guide for detailed instructions on creating the certificate needed to use Apple's Push Notification Service (APNs).
After you have the certificate, head to the OneSignal Dashboard
- ChooseSettings -> Platforms
- Activate the iOS card
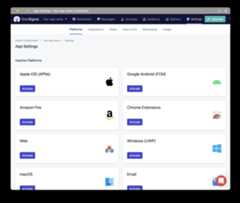
- Upload your certificate and enter the password you used to encrypt it. If you didn't set a password, leave the password input blank.


Consent is required before we can present push notifications to a user. It's recommend to use an in-app message to ask for consent because no prior consent is needed to present them. This is particularly useful in situations where a user accidentally declines consent. We have an in-depth guide explaining this strategyhere.
SelectNew Message -> New In-App and name it "prompt_notification"

Configure an in-app message with at least one button; here's the message with two buttons I configured for this sample using our Block Editor!

Add thePush Permission PromptClick Action to the primary call to action button.

SelectAdd Trigger -> In-App Trigger to present the in-app message when specific conditions are met

Schedule the message to start showingImmediately, toShow forever, and to showEvery time trigger conditions are satisfied
SelectMake Message Live to publish message


If you didn't name your in-app message "prompt_notification", you'll need to update theFlutter app's code to use your name.
Run this command to interactively configure a new Supabase project
supabase projects create onesignal-supabase-sample-integration -i


Supabase projects are more secure by default. The front-end client consuming this project does not support magic links. Disabling email confirmation is needed to run thecompanion sample app.
- From the Supabase Dashboard, navigate to your project's Authenication pane.

- SelectProviders under the Configuration header.
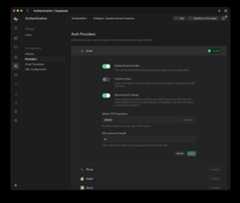
- DisableConfirm email and selectSave.


We can rely on Supabase to automatically insert a user profile after user signup. Supabase provides Database Functions and Triggers that enable us to react to events on the database. For this sample integration, we will edit the existing functionon_auth_user_created.
Navigate to Database -> Triggers

Edit the backing function by navigating to Functions and clicking the edit button located in the context-menu for the record
handle_new_user.
Paste the 👇 script as theDefintion and selectConfirm


begininsert intopublic.profiles (id, email)values (new.id,new.raw_user_meta_data->>'email'); return new;end;

The Supabase CLI's command to create a function will add the boilerplate for an edge function located in a directory with the name specified in the command,push/index.ts.
supabase functions new push-order-confirmation-to-customer

This function is responsible for calling the OneSignal API usingonesignal-node-sdk.
Supabase Edge Functions are executed in the Deno enfironment on the edge, so
- Functions are written in TypeScript
- You can't install packages with a package manager like npm or Yarn
Function logic is implemented inpush/index.ts (Here).
We can't use a traditional package manager to install packages, so we're usingesm.sh – a global CDN for npm packages – to load theonesignal-node-api module.
| import*asOneSignalfrom "https://esm.sh/@onesignal/node-onesignal@1.0. |
Deno'sDeno.env object exposes the values we need.
onesignal-supabase-sample-integration-supabase/supabase/functions/_utils/config.ts
Lines 5 to 7 in12df6f5
| exportconst_OnesignalAppId_=Deno.env.get("ONESIGNAL_APP_ID")! | |
| const_OnesignalUserAuthKey_=Deno.env.get("USER_AUTH_KEY")! | |
| exportconst_OnesignalRestApiKey_=Deno.env.get("ONESIGNAL_REST_API_KEY")! |
Create the OneSignal API client so we can send a request to the API.
onesignal-supabase-sample-integration-supabase/supabase/functions/_utils/config.ts
Line 12 in12df6f5
| exportconstonesignal=newOneSignal.DefaultApi(configuration) |
Now we can configure the notification object.
Lines 24 to 29 in12df6f5
| constnotification=newOneSignal.Notification() | |
| notification.app_id=_OnesignalAppId_ | |
| notification.include_external_user_ids=[profile] | |
| notification.contents={ | |
| en:generateMessage(record.amount,record.currency), | |
| } |
And send the notification to OneSignal to send the push notification.
Line 30 in12df6f5
| constonesignalApiRes=awaitonesignal.createNotification(notification) |
Supabase will respect local environment variables set insupabase/.env.local.
Copy.env.example and fill in your keys from OneSignal app.
$ cp supabase/.env.example supabase/.env.local
Use the Supabase CLI to set environment variables in the Supabase project.
$ supabase secretsset test=123Finished supabase secrets set.
Use the Supabase CLI to remove environmental variables in the Supabase project.
$ supabase secretsunsettestFinished supabase secrets unset.
💡You only need to run steps 1 since this sample includes migrations files (here).
Run
supabase db diffand copy its outputCreate a new migration and paste the output from the previous step into the
.sqlfileRun
supabase db pushto apply migrations to the hosted project


We can deploy edge functions to a local or production environment. Developing locally allows us to test and iterate quickly.
- Start the Supabase Docker container, navigate to the root directory of this sample project and run
supabase start - To serve the function, run
supabase functions serve push --env-file ./supabase/.env.local --debug - Submit a request to the endpoint making sure to use theanon key as your bearer token.
Result of runningsupabase start
$ supabase startSeeding data supabase/seed.sql...Started supabaselocal development setup.API URL: http://localhost:54321DB URL: postgresql://postgres:postgres@localhost:54322/postgresStudio URL: http://localhost:54323Inbucket URL: http://localhost:54324JWT secret: super-secret-jwt-token-with-at-least-32-characters-longanon key: eyJhbGciOiJIUzI1NiIsInR5cCI6IkpXVCJ9.eyJpc3MiOiJzdXBhYmFzZS1kZW1vIiwicm9sZSI6ImFub24ifQ.625_WdcF3KHqz5amU0x2X5WWHP-OEs_4qj0ssLNHzTsservice_role key: eyJhbGciOiJIUzI1NiIsInR5cCI6IkpXVCJ9.eyJpc3MiOiJzdXBhYmFzZS1kZW1vIiwicm9sZSI6InNlcnZpY2Vfcm9sZSJ9.vI9obAHOGyVVKa3pD--kJlyxp-Z2zV9UUMAhKpNLAcUServing a function to the local instance of Supabase.

Supabase makes deploying your project to production simple with their CLI.
supabase functions deploy push
If the command ☝️ doesn't work for you, try executing the command with the--legacy-bundle flag set.

For complete instructions on creating a webhooks, please refer to theSupabase docs.

- From the Database -> Webhooks page SelectCreate a new hook button
- Name the hook "push-order-confirmation-to-user"
- Set the table to
orders - SelectInsert checkbox
- Set hook type to HTTP Request
- Set the HTTP request method toPOST
- Set the URL to the edge function,
push-order-confirmation-to-customer - Add a HTTP Header named
Authorizationand set the value toBearer [Your Supabase project's anonKey] - SelectConfirm confirm button to complete setup
💡We need to include the Authorization header so the edge function can verify the request. Without this header, anyone would be able to call our endpoint.
{type:"INSERT",table:"orders",record:{id:"796a354b-c087-4afe-8614-5a1015221d04",amount:1099,currency:"usd",created_at:"2022-11-30T18:41:42.605",stripe_pi_id:"pi_3M9vDvKCO1JeQB0L1PGzangD",stripe_customer_id:"cus_MtibdpF533vFYn"},schema:"public",old_record:null}
Thecompanion app andsupporting API can be built from source to run alongside this Supabase project.

TheSupabase dashboard presents all deployed functions along with their time of deployment and status.

Supabase enables you to review HTTP request logs to assist with our debugging.

Ourconsole.logs will appear here!

For additional resources, please join theOneSignal Developer Community.
Get in touch with us or learn more about OneSignal through the channels below.
- Follow us on Twitter to never miss any updates from the OneSignal team, ecosystem & community
- Join us on Discord to be a part of the OneSignal Developers community, showcase your work and connect with other OneSignal developers
- Read the OneSignal Blog for the latest announcements, tutorials, in-depth articles & more.
- Subscribe to us on YouTube for walkthroughs, courses, talks, workshops & more.
- Follow us on Twitch for live streams, office hours, support & more.
Give a ⭐️ if this project helped you, and watch this repo to stay up to date.
About
Sample integration to send a push notification using OneSignal from a Supabase edge function.
Topics
Resources
Uh oh!
There was an error while loading.Please reload this page.
Stars
Watchers
Forks
Uh oh!
There was an error while loading.Please reload this page.