Ember JS – An In-Depth Introduction
- 35 min read
- Coding,Tools,JavaScript,Techniques,HTML
- Share onTwitter, LinkedIn

Email Newsletter
Weekly tips on front-end & UX.
Trusted by 200,000+ folks.


Ember JS is a client-side javascript framework for creating aspiring single-page web apps. With the release of Ember JS 1.0, it’s just about time to consider giving it a try. This article aims to introduce Ember.js to newcomers who want to learn about this framework.
Users often say that the learning curve is steep, but once you’ve overcome the difficulties, then Ember.js is tremendous. This happened to me as well. While theofficial guides are more accurate and up to date than ever (for real!), this post is my attempt to make things even smoother for beginners.
Further Reading on SmashingMag:
- React To The Future With Isomorphic Apps
- Write Your Next Web App With Ember CLI
- An Introduction To Full-Stack JavaScript
- Get Up And Running With Grunt
First, we will clarify the main concepts of the framework. Next, we’ll go in depth with a step-by-step tutorial that teaches you how to build a simple Web app with Ember.js and Ember-Data, which is Ember’s data storage layer. Then, we will see howviews andcomponents help with handling user interactions. Finally, we will dig a little more into Ember-Data and template precompiling.
Roll up your sleeves andboost your UX skills! MeetSmart Interface Design Patterns 🍣, a 10h video library by Vitaly Friedman.100s of real-life examples and live UX training.Free preview.
Jump to table of contents ↬
Theunstyled demo below will help you follow each step of the tutorial. Theenhanced demois basically the same but with a lot more CSS and animations and a fully responsive UX when displayed on small screens.
Table of Contents
- Further Reading on SmashingMag:
- Definitions Of Ember JS Main Concepts
- Let’s Build An App
- Sketch Our App
- What You’ll Need to Get Started
- Our Files Directory Structure
- Precompile Templates or Not?
- Set Up the Model With Ember-Data’s FixtureAdapter
- Instantiate the Router
- The Application Template
- The Users Route
- Object vs. Array Controller
- Displaying the Number of Users
- Computed Properties
- Redirecting From the Index Page
- Single User Route
- Edit a User
- Our First Action
- TransitionTo or TransitionToRoute?
- Saving User Modifications
- Delete a User
- Create a User
- Format Data With Helpers
- Format Data With Bound Helpers
- Switch to the LocalStorage Adapter
- Playing With Views
- What Is Ember-Data?
- What Is Handlebars Template Precompiling?
- Tools, Tips And Resources
- Conclusion
Definitions Of Ember JS Main Concepts
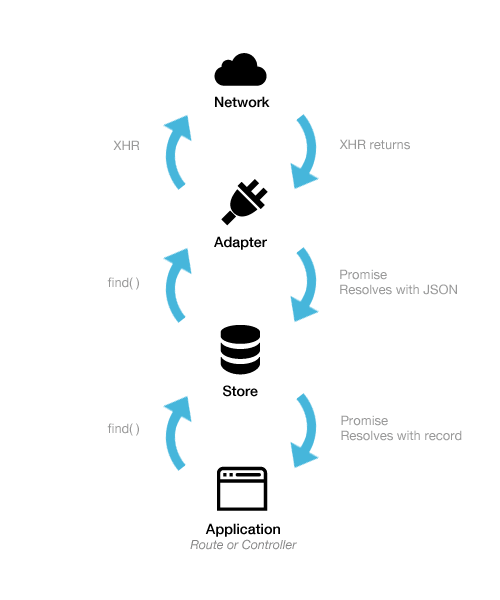
The diagram below illustrates how routes, controllers, views, templates and models interact with each other.
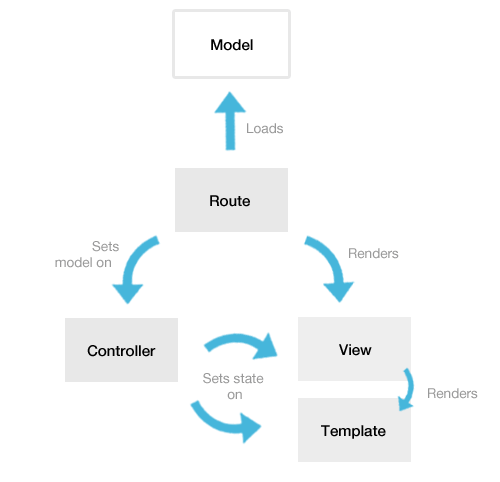
Let’s define these concepts. And if you’d like to learn more, check the relevant section of the official guides:
Models
Suppose our application handles a collection of users. Well, those users and their informations would be the model. Think of them as the database data. Models may be retrieved and updated by implementing AJAX callbacks inside your routes, or you can rely on Ember-Data (a data-storage abstraction layer) to greatly simplify the retrieval, updating and persistence of models over a REST API.
The Router
There is theRouter, and then there are routes. TheRouter is just a synopsis of all of your routes. Routes are the URL representations of your application’s objects (for example, a route’sposts will render a collections of posts). The goal of routes is to query the model, from theirmodel hook, to make it available in the controller and in the template. Routes can also be used to set properties in controllers, to execute events and actions, and to connect a particular template to a particular controller. Last but not least, themodel hook can return promises so that you can implement aLoadingRoute, which will wait for the model to resolve asynchronously over the network.
Controllers
At first, acontroller gets a model from aroute. Then, it makes the bridge between the model and the view or template. Let’s say you need a convenient method or function for switching between editing mode to normal mode. A method such asgoIntoEditMode() andcloseEditMode() would be perfect, and that’s exactly what controllers can be used for.
Controllers are auto-generated by Ember.js if you don’t declare them. For example, you can create auser template with aUserRoute; and, if you don’t create aUserController (because you have nothing special to do with it), then Ember.js will generate one for you internally (in memory). TheEmber Inspector extension for Chrome can help you track those magic controllers.
Views
Views represent particular parts of your application (the visual parts that the user can see in the browser). AView is associated with aController, a Handlebarstemplate and aRoute. The difference between views and templates can be tricky. You will find yourself dealing with views when you want to handle events or handle some custom interactions that are impossible to manage from templates. They have a very convenientdidInsertElement hook, through which you can play with jQuery very easily. Furthermore, they become extremely useful when you need to build reusable views, such as modals, popovers, date-pickers and autocomplete fields.
Components
AComponent is a completely isolatedView that has no access to the surrounding context. It’s a great way to build reusable components for your apps. ATwitter Button, a customselect box and thosereusable charts are all great examples of components. In fact, they’re such a great idea that the W3C is actually working with the Ember team on acustom element specification.
Templates
Simply put, a template is the view’s HTML markup. It prints the model data and automatically updates itself when the model changes. Ember.js usesHandlebars, a lightweight templating engine also maintained by the Ember team. It has the usual templating logic, likeif andelse, loops and formattinghelpers, that kind of stuff. Templates may be precompiled (if you want to cleanly organize them as separate.hbs or.handlebars files) or directly written in<script type="text/x-handlebars"></script> tags in your HTML page. Jump to the section ontemplates precompiling to dig into the subject.
Helpers
Handlebars helpers are functions that modify data before it is rendered on the screen — for example, to format dates better thanMon Jul 29 2013 13:37:39 GMT+0200 (CEST). In your template, the date could be written as {{date}}. Let’s say you have aformatDate helper (which converts dates into something more elegant, like “One month ago” or “29 July 2013”). In this case, you could use it like so:{{formatDate date}}.
Components? Helpers? Views? HELP!
The Ember.js forumhas an answer and StackOverflowhas a response that should alleviate your headache.
Let’s Build An App
In this section, we’ll build a real app, a simple interface for managing a group of users (aCRUD app). Here’s what we’ll do:
- look at the architecture we’re aiming for;
- get you started with the dependencies, files structure, etc.;
- set up the model with Ember-Data’s
FixtureAdapter; - see how routes, controllers, views and templates interact with each other;
- finally, replace the
FixtureAdapterwith theLSAdapterto persist data in the browser’s local storage.
Sketch Our App
We need a basic view to render a group of users (see 1 below). We need a single-user view to see its data (2). We need to be able to edit and delete a given user’s data (3). Finally, we need a way to create a new user; for this, we will reuse the edit form.
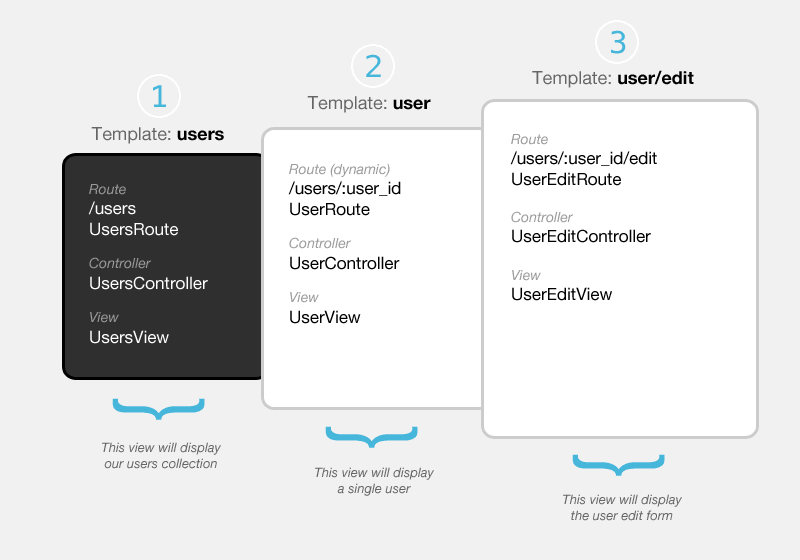
Ember.js strongly relies on naming conventions. So, if you want the page/foo in your app, you will have the following:
- a
footemplate, - a
FooRoute, - a
FooController, - and a
FooView.
Learn more aboutEmber’s naming conventions in the guides.
What You’ll Need to Get Started
You will need:
- jQuery,
- Ember.js itself (obviously),
- Handlebars (i.e. Ember’s templating engine),
- Ember-Data (i.e. Ember’s data-persistence abstraction layer).
/* /index.html*/ … <script src="//code.jquery.com/jquery-2.0.3.min.js"></script> <script src="//builds.emberjs.com/handlebars-1.0.0.js"></script> <script src="//builds.emberjs.com/tags/v1.1.2/ember.js"></script> <script src="//builds.emberjs.com/tags/v1.0.0-beta.3/ember-data.js"></script> <script> // your code </script></body></html>Ember’s website has abuilds section, where you can find all of the links for Ember JS and Ember-Data. Currently, Handlebars is not there; you will find it on theofficial Handlebars website.
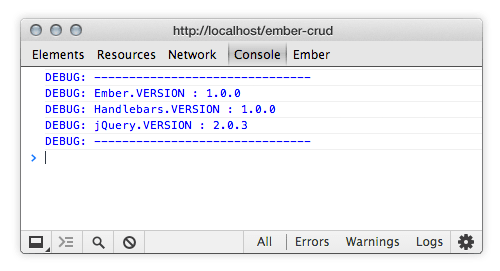
Once we have loaded the required dependencies, we can get started building our app. First, we create a file named app.js, and then we initialize Ember:
/* /app.js*/window.App = Ember.Application.create();Just to be sure everything is OK, you should see Ember’s debugging logs in the browser’s console.
Our Files Directory Structure
There’s not much of a convention on how to organize files and folders. TheEmber App Kit (a Grunt-based environment to scaffold Ember apps) provides a kind of standard for this because it is maintained by the Ember team. Even simpler, you could put everything in a singleapp.js file. In the end, it’s really up to you.
For this tutorial, we will simply put controllers in acontrollers folder, views in aviews folder and so on.
components/controllers/helpers/models/routes/templates/views/app.jsrouter.jsstore.jsPrecompile Templates or Not?
There are two ways to declare templates. The easiest way is to add specialscript tags to yourindex.html file.
<script type="text/x-handlebars"> <div>I'm a template</div></script>Each time you need a template, you’d add another script tag for it. It’s fast and easy but can become a real mess if you have too many templates.
The other way is to create an.hbs (or.handlebars) file for each of your templates. This is called “template precompiling,” and acomplete section is dedicated to it later in this article.
Ourunstyled demo uses<script type="text/x-handlebars"> tags, and all of the templates for ourenhanced demo are stored in.hbs files, which are precompiled with aGrunt task. This way, you can compare the two techniques.
Set Up the Model With Ember-Data’s FixtureAdapter
Ember-Data is a library that lets you retrieve records from a server, hold them in aStore, update them in the browser and, finally, save them back to the server. The Store can be configured with various adapters (for example, theRESTAdapter interacts with a JSON API, and theLSAdapter persists your data in the browser’s local storage). Anentire section is dedicated to Ember-Data later in this article.
Here, we are going to use theFixtureAdapter. So, let’s instantiate it:
/* /store.js*/App.ApplicationAdapter = DS.FixtureAdapter;In previous versions of Ember, you had to subclass theDS.Store. We don’t need to do that anymore to instantiate adapters.
TheFixtureAdapter is a great way to start with Ember JS and Ember-Data. It lets you work with sample data in the development stage. At the end, we will switch to theLocalStorage adapter (orLSAdapter).
Let’s define our model. A user would have aname, anemail address, a shortbio, anavatarUrl and acreationDate.
/* /models/user.js*/App.User = DS.Model.extend({ name : DS.attr(), email : DS.attr(), bio : DS.attr(), avatarUrl : DS.attr(), creationDate : DS.attr()});Now, let’s feed ourStore with the sample data. Feel free to add as many users as you need:
/* /models/user.js*/App.User.FIXTURES = [{ id: 1, name: 'Sponge Bob', email: 'bob@sponge.com', bio: 'Lorem ispum dolor sit amet in voluptate fugiat nulla pariatur.', avatarUrl: 'https://jkneb.github.io/ember-crud/assets/images/avatars/sb.jpg', creationDate: 'Mon, 26 Aug 2013 20:23:43 GMT'}, { id: 2, name: 'John David', email: 'john@david.com', bio: 'Lorem ispum dolor sit amet in voluptate fugiat nulla pariatur.', avatarUrl: 'https://jkneb.github.io/ember-crud/assets/images/avatars/jk.jpg', creationDate: 'Fri, 07 Aug 2013 10:10:10 GMT'}…];Learn more aboutmodels in the documentation.
Instantiate the Router
Let’s define ourRouter with the routes we want (based on thediagram we made earlier).
/* /router.js*/App.Router.map(function(){ this.resource('users', function(){ this.resource('user', { path:'/:user_id' }, function(){ this.route('edit'); }); this.route('create'); });});ThisRouter will generate exactly this:
| URL | Route Name | Controller | Route | Template |
|---|---|---|---|---|
| N/A | N/A | ApplicationController | ApplicationRoute | application |
/ | index | IndexController | IndexRoute | index |
| N/A | users | UsersController | UsersRoute | users |
/users | users.index | UsersIndexController | UsersIndexRoute | users/index |
| N/A | user | UserController | UserRoute | user |
/users/:user_id | user.index | UserIndexController | UserIndexRoute | user/index |
/users/:user_id/edit | user.edit | UserEditController | UserEditRoute | user/edit |
/users/create | users.create | UsersCreateController | UsersCreateRoute | users/create |
The:user_id part is called a dynamic segment because the corresponding user ID will be injected into the URL. So, it will look like/users/3/edit, where3 is the user with the ID of 3.
You can define either aroute or aresource. Keep in mind that aresource is a group of routes and that it allows routes to be nested.
Aresource also resets the nested naming convention to the last resource name, which means that, instead of havingUsersUserEditRoute, you would haveUserEditRoute. In other words, in case this confuses you, if you have a resource nested inside another resource, then your files name would be:
UserEditRouteinstead ofUsersUserEditRoute;UserEditControlerinstead ofUsersUserEditController;UserEditViewinstead ofUsersUserEditView;- for templates,
user/editinstead ofusers/user/edit.
Learn more abouthow to define routes in the guides.
The Application Template
Each Ember JS app needs anApplication template, with an{{outlet}} tag that holds all other templates.
/* /templates/application.hbs*/<div> <h1>Hello World</h1> {{outlet}}</div>If you’ve decided to follow this tutorial without precompiling templates, here’s what yourindex.html should look like:
/* /index.html*/ … <script type="text/x-handlebars"> <div> <h1>Hello World</h1> {{outlet}} </div> </script> <script src="dependencies.js"></script> <script src="your-app.js"></script></body></html>The Users Route
This route deals with our group of users. Remember we sawearlier, in the definitions, that a route is responsible for querying the model. Well, routes have amodel hook through which you can perform AJAX requests (for retrieving your models, if you don’t use Ember-Data) or for querying yourStore (if you do use Ember-Data). If you’re interested in retrieving models without Ember-Data, you canjump to the section in which I briefly explain how to do it.
Now, let’s create ourUsersRoute:
/* /routes/usersRoute.js*/App.UsersRoute = Ember.Route.extend({ model: function(){ return this.store.find('user'); }});Learn more abouthow to specify the routes model hook in the guides.
If you visit your app at the URL https://localhost/#/users, nothing will happen, because we need ausers template. Here it is:
/* /templates/users.hbs*/<ul> {{#each user in controller}} <li>{{user.name}}</li> {{else}} <li>no users… :-(</li> {{/each}}</ul>Theeach loop iterates over the users collection; here,controller equalsUsersController. Notice that the{{#each}} loop has an{{else}} statement; so, if the model is empty, thenno users… :-( will be printed.
Because we’ve followed Ember’s naming conventions, we can omit the declaration of theUsersController. Ember will guess that we are dealing with a collection because we’ve used the plural of “user.”
Object vs. Array Controller
AnObjectController deals with a single object, and anArrayController deals with multiple objects (such as a collection). We just saw that, in our case, we don’t need to declare theArrayController. But for the purpose of this tutorial, let’s declare it, so that we can set some sorting properties on it:
/* /controllers/usersController.js*/App.UsersController = Ember.ArrayController.extend({ sortProperties: ['name'], sortAscending: true // false = descending});Here, we’ve simply sorted our users alphabetically. Learn more aboutcontrollers in the guides.
Displaying the Number of Users
Let’s useUsersController to create our firstcomputed property. This will display the number of users, so that we can see changes when adding or deleting users.
In the template, we just need something as simple as this:
/* /templates/users.hbs*/…<div>Users: {{usersCount}}</div>…InUsersController, let’s declare theusersCount property — but not like a regular property, because this one will be a function that returns the model’s length.
/* /controllers/usersController.js*/App.UsersController = Em.ArrayController.extend({ … usersCount: function(){ return this.get('model.length'); }.property('@each')});Basically,usersCount takes the.property(‘@each’) method, which tells Ember.js that this function is in fact a property that is watching for any changes to one of the models in the collection (i.e. the users). Later, we will seeusersCount incrementing and decrementing as we create and delete users.
Computed Properties
Computed properties are powerful. They let you declare functions as properties. Let’s see how they work.
App.Person = Ember.Object.extend({ firstName: null, lastName: null, fullName: function() { return this.get('firstName') + ' ' + this.get('lastName'); }.property('firstName', 'lastName')});var ironMan = App.Person.create({ firstName: "Tony", lastName: "Stark"});ironMan.get('fullName') // "Tony Stark"In this example, thePerson object has two static properties, which arefirstName andlastName. It also has afullName computed property, which concatenates a full name by retrieving the value of the two static properties. Note that the.property(‘firstName’, ‘lastName’) method tells the function to re-execute if eitherfirsName orlastName changes.
Properties (whether static or computed) are retrieved with.get(‘property’) and can be set with.set(‘property’, newValue).
If you find yourself setting multiple properties consecutively, a better way to do it is with one single.setProperties({}), rather than with multiple instances of.set(). So, instead of doing this…
this.set('propertyA', 'valueA');this.set('propertyB', valueB);this.set('propertyC', 0);this.set('propertyD', false);… you would do this:
this.setProperties({ 'propertyA': 'valueA', 'propertyB': valueB, 'propertyC': 0, 'propertyD': false});The documentation has so much more information about how to bind data withcomputed properties,observers andbindings.
Redirecting From the Index Page
If you go to the home page of your app (https://localhost/), you might be asking yourself why nothing is happening. That’s because you are viewing the index page, and we don’t have anindex template. Let’s add one, then. We’ll call itindex.hbs.
Ember.js will notice that you are creating theindex template forIndexRoute; so, no need to tell it anything else about the index in theRouter. This is called an initial route. Three of them are available:ApplicationRoute,IndexRoute andLoadingRoute. Learn more about themin the guides.
Now, let’s add a link to the user’s page with the{{#link-to}}…{{/link-to}} block helper. Why a block helper? Because you’re able to write text between the opening and closing tags, as if it were a real custom HTML element.
/* /templates/index.hbs*/{{#link-to "users"}} Go to the users page {{/link-to}}This takes the route’s name that you want to link to as the first argument (the second optional argument is a model). Under the hood, it’s just a regular<a> element, although Ember also handles for us theactive class name when reaching the matching route. Thoselink-to’s are perfect for navigation menus. Learn more about themin the guides.
Another approach would be to tell IndexRoute to redirect to UsersRoute. Again, pretty easy:
/* /routes/indexRoute.js*/App.IndexRoute = Ember.Route.extend({ redirect: function(){ this.transitionTo('users'); }});Now, when you visit the home page, you will immediately be redirected to the/#/users URL.
Single User Route
Before getting our hands dirty with building the dynamic segment, we need a way to link to each user from theusers template. Let’s use the {{#link-to}} block helper inside the user’seach loop.
/* /templates/users.hbs*/…{{#each user in controller}} <li> {{#link-to "user" user}} {{user.name}} {{/link-to}} </li>{{/each}}The second argument oflink-to is the model that will be passed toUserRoute.
OK, let’s get back to our single user template. It looks like this:
/* /templates/user.hbs*/<div> <img {{bind-attr src="avatarUrl"}} alt="User's avatar" /> <h2>{{name}}</h2> <span>{{email}}</span> <p>{{bio}}</p> <span>Created {{creationDate}}</span></div>Note that you can’t use<img src="{{avatarUrl}}">, because data inside attributes are bound with thebind-attr helper. For instance, you could do something like<img {{bind-attr height="imgHeight}}"/>, whereimgHeight is a computed property in the current controller.
You’ll find all you need to know about bindingattributes andclass names in the guides.
So far, so good. But nothing happens when you click on the user’s links, because we told theRouter that we wantUserRoute to be nested inUsersRoute. So, we need an{{outlet}} in which to render the user template.
/* /templates/users.hbs*/…{{#each user in controller}}…{{/each}}{{outlet}}An{{outlet}} is like a dynamic placeholder into which other templates can be injected when{{#link-to}} tags are clicked. It allows for views to be nested.
Now, you should be able to view the user template injected in the page when visiting the page at the URL/#/users/1.
Hey, wait a minute! We have declared neitherUserRoute norUserController, but it’s still working! Why is that? Well,UserRoute is the singular ofUsersRoute, so Ember has generated the route and the controller for us (in memory). Thank goodness for naming conventions!
For the sake of consistency, let’s declare them anyway, so that we can see how they look:
/* /routes/userRoute.js*/App.UserRoute = Ember.Route.extend({ model: function(params) { return this.store.find('user', params.user_id); }});/* /controllers/userController.js*/App.UserController = Ember.ObjectController.extend();Learn more aboutdynamic segments in the guides.
Edit a User
Moving on to the edit user form nested in the single user, the template looks like this:
/* /templates/user/edit.hbs*/<div> <label>Choose user avatar</label> {{input value=avatarUrl}} <label>User name</label> {{input value=name}} <label>User email</label> {{input value=email}} <label>User short bio</label> {{textarea value=bio}}</div>Let’s talk about those{{input}} and{{textarea}} tags. This form’s goal is to enable us to edit the user’s data, and these custominput tags take the model’s properties as parameters to enable data-binding.
Note that it’svalue=model, without the” “. The{{input}} helper is a shorthand for{{Ember.TextField}}. Ember.js has thosebuilt-in views especially for form elements.
If you visit your app at the URL/#/users/1/edit, nothing will happen, because, again, we need an{{outlet}} to nest the edit template into the single user template.
/* /templates/user.hbs*/…{{outlet}}Now, the template is correctly injected in the page. But the fields are still empty, because we need to tell the route which model to use.
/* /routes/userEditRoute.js*/App.UserEditRoute = Ember.Route.extend({ model: function(){ return this.modelFor('user'); }});ThemodelFor method lets you use the model of another route. Here, we’ve toldUserEditRoute to get the model ofUserRoute. The fields are now correctly populated with the model data. Try to edit them — you will see the changes occur in the parent templates as well!
Our First Action
OK, now we need a button to click that redirects us fromUserRoute toUserEditRoute.
/* /templates/user.hbs*/<div> <button {{action "edit"}}>Edit</button> …We just added a simplebutton that triggers our first{{action}}. Actions are events that trigger associated methods in their current controller. If no method is found in the controller, then the action bubbles up through routes until it matches something. This is explained wellin the guides.
In other words, if weclick on thebutton, then it will trigger theedit action found in the controller. So, let’s add it toUserController:
/* /controllers/userController.js*/App.UserController = Ember.ObjectController.extend({ actions: { edit: function(){ this.transitionToRoute('user.edit'); } }});Actions, whether in controllers or in routes, are stored in anactions hash. But this is not the case for default actions, such asclick,doubleClick,mouseLeave anddragStart. The Ember.js website has acomplete list.
Here, basically, ouredit action says, “Go to the user.edit route.” That’s pretty much it.
TransitionTo or TransitionToRoute?
On a side note, transitioning from routes is slightly different from transitioning from controllers:
// from a routethis.transitionTo('your.route')// from a controllerthis.transitionToRoute('your.route')Saving User Modifications
Let’s see how to save modifications after a user’s data has been edited. By saving, we mean persisting the changes. With Ember-Data, this means tellingStore tosave() the newrecord of the modified user. TheStore will then tell theadapter to perform an AJAX PUT request (if our adapter is theRESTAdapter).
From our application’s point of view, this would be an “OK”button that saves modifications and then transitions to the parent route. Again, we’ll use an{{action}}.
/* /templates/user/edit.hbs*/<button {{action "save"}}> ok </button>/* /controllers/userEditController.js*/App.UserEditController = Ember.ObjectController.extend({ actions: { save: function(){ var user = this.get('model'); // this will tell Ember-Data to save/persist the new record user.save(); // then transition to the current user this.transitionToRoute('user', user); } }});Our edit mode is working well. Now, let’s see how to delete a user.
Delete a User
We can add a deletebutton beside the edit button in theuser template — again, with adelete{{action}}, this time defined inUserController.
/* /templates/user.hbs*/<button {{action "delete"}}>Delete</button>/* /controllers/userController.js*/…actions: { delete: function(){ // this tells Ember-Data to delete the current user this.get('model').deleteRecord(); this.get('model').save(); // then transition to the users route this.transitionToRoute('users'); }}Now, when you click on the “Delete” button, theuser is instantly trashed. A bit rough. We should add a confirm state, something like “Are you sure?” with “Yes” and “No” buttons. To do this, we need to change{{action “delete”}} to make it showconfirm-box instead of immediately deleting the user. Then, we obviously need to putconfirm-box in the user template.
/* /templates/user.hbs*/{{#if deleteMode}}<div> <h4>Really?</h4> <button {{action "confirmDelete"}}> yes </button> <button {{action "cancelDelete"}}> no </button></div>{{/if}}We’ve just written our first Handlebars{{if}} statement. It printsdiv.confirm-box only if thedeleteMode property istrue. We need to define thisdeleteMode in the current controller and then change thedelete action to make it toggledeleteMode’s value totrue orfalse. Now, ourUserController looks like this:
/* /controllers/userController.js*/App.UserController = Ember.ObjectController.extend({ // the deleteMode property is false by default deleteMode: false, actions: { delete: function(){ // our delete method now only toggles deleteMode's value this.toggleProperty('deleteMode'); }, cancelDelete: function(){ // set deleteMode back to false this.set('deleteMode', false); }, confirmDelete: function(){ // this tells Ember-Data to delete the current user this.get('model').deleteRecord(); this.get('model').save(); // and then go to the users route this.transitionToRoute('users'); // set deleteMode back to false this.set('deleteMode', false); }, // the edit method remains the same edit: function(){ this.transitionToRoute('user.edit'); } }});Deletion now works perfectly with the “Yes” and “No” buttons. Awesome! Finally, the last thing to build is the create route.
Create a User
To create a user, let’s do something fun: Let’s reuse the edit template, because the create form will be exactly the same as the edit user form. First, we declare the create route, which will return an empty object in itsmodel hook:
/* /routes/usersCreateRoute.js*/App.UsersCreateRoute = Ember.Route.extend({ model: function(){ // the model for this route is a new empty Ember.Object return Em.Object.create({}); }, // in this case (the create route), we can reuse the user/edit template // associated with the usersCreateController renderTemplate: function(){ this.render('user.edit', { controller: 'usersCreate' }); }});Note therenderTemplate method; it enables us to associate a particular template with a route. Here, we’re tellingUsersCreateRoute to use the user and edit template withUsersCreateController. Learn more about renderTemplatein the guides.
Now, let’s define anothersave action, but this time inUsersCreateController. (Remember that anaction first tries to match a corresponding method in thecurrent controller.)
/* /controllers/usersCreateController.js*/App.UsersCreateController = Ember.ObjectController.extend({ actions: { save: function(){ // just before saving, we set the creationDate this.get('model').set('creationDate', new Date()); // create a record and save it to the store var newUser = this.store.createRecord('user', this.get('model')); newUser.save(); // redirects to the user itself this.transitionToRoute('user', newUser); } }});Finally, let’s add the{{#link-to}} helper in the users templates, so that we can access the creation form:
/* /templates/users.hbs*/{{#link-to "users.create"}} Add user {{/link-to}}…That’s all there is to creating users!
Format Data With Helpers
We’vealready defined whathelpers are. Now, let’s see how to create one that will format an ugly date into a nice clean formatted one. TheMoment.js library is awesome for this purpose.
GrabMoment.js and load it in the page. Then, we’ll define our first helper:
/* /helpers/helpers.js*/Ember.Handlebars.helper('formatDate', function(date){ return moment(date).fromNow();});Modify the user template so that it uses the formatDate helper on the{{creationDate}} property:
/* /templates/user.hbs*/…<span>Created {{formatDate creationDate}}</span>…That’s it! You should see the dates nicely formatted: “2 days ago,” “One month ago,” etc.
Format Data With Bound Helpers
In this case, our date is static data because it’s not going to change in the future. But if you have data that needs to be updated (for example, a formatted price), then you would have to use aBoundHelper instead of the regular helper.
/* /helpers/helpers.js*/Ember.Handlebars.registerBoundHelper('formatDate', function(date){ return moment(date).fromNow();});A bound helper is able to automatically update itself if the data changes. Learn more about bound helpers in the guides.
Switch to the LocalStorage Adapter
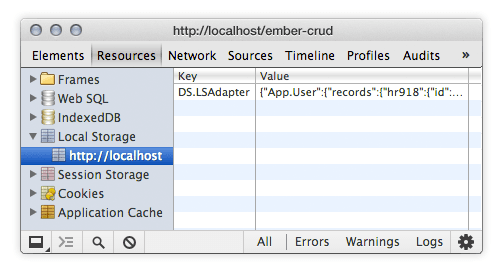
Our app looks to be working fine, so we are ready to switch to the real thing. We could enable theRESTAdapter, but then we would need a REST server on which we could perform GET, PUT, POST and DELETE requests. Instead, let’s useLSAdapter, a third-party adapter that you candownload on GitHub. Load it in your page (just after Ember-Data), comment out all of theFIXTURE data, and changeApplicationAdapter toDS.LSAdapter:
/* /store.js*/App.ApplicationAdapter = DS.LSAdapter;Now, your users’ data will persist in local storage. That’s all! Seriously, it’s that easy. Just to be sure, open the Developer Tools in your browser and go into the “Resource” panel. In the “Local Storage” tab, you should find an entry forLSAdapter with all of your users’ data.
Playing With Views
So far, we haven’t declared any views in our simple CRUD, only templates. Why would we care about views? Well, they are powerful for events handling, animations and reusable components.
jQuery and the didInsertElement
How can we use jQuery the way we are used to for Ember.js’ views? Each view and component has adidInsertElement hook, which assures us that the view has indeed been inserted into the DOM. With that, you have secure jQuery access to elements in the page.
App.MyAwesomeComponent = Em.Component.extend({ didInsertElement: function(){ // this = the view // this.$() = $(the view) this.$().on('click', '.child .elem', function(){ // do stuff with jQuery }); }});If you’ve registered jQuery-like events from insidedidInsertElement, then you can usewillDestroyElement to clean them up after the view has been removed from the DOM, like so:
App.MyAwesomeComponent = Em.Component.extend({ didInsertElement: function(){ this.$().on('click', '.child .elem', function(){ // do stuff with jQuery }); }, willDestroyElement: function(){ this.$().off('click'); }});Side Panel Components With className Bindings
The combination of computed property andclassName binding sounds like a scary technique, but it’s really not that bad. The idea is that we add or remove a CSS class on an element if a property is eithertrue orfalse. Of course, the CSS class contains a CSS transition.
Suppose we have a hidden div in the DOM. When this div has a class ofopened, it slides in. When it has a class ofclosed, it slides out. A side panel is a perfect example for this, so let’s build one.
Here’s a JS Bin so that you can test the code:
Let’s go through each tab in turn:
- JavaScript tab. First, we declare our
SidePanelComponentwith defaultclassNames. Then,classNameBindingsis used to test whetherisOpenistrueorfalse, so that it returnsclosedoropened. Finally,componenthas atoggleSidepanelaction that simply toggles theisOpenboolean. - HTML tab. This is the side panel’s markup. Note the
{{#side-panel}}…{{/side-panel}}block tags; we can put whatever we want between them, which makes our side panel incredibly reusable. Thebtn-togglebutton calls thetoggleSidepanelaction located in the component. The{{#if isOpen}}adds some logic by checking the value of theisOpenproperty. - CSS tab. Here, we are basically putting the side panel off screen. The
openedclass slides it in, andclosedslides it out. The animation is possible because we are listening fortranslate2Dchanges (transition:transform .3s ease).
The guides have a lot more examples on how to bind class namesfrom components andfrom inside templates.
Modals With Layout and Event Bubbling
This technique is way more complicated than the previous one, because a lot of Ember.js features are involved. The idea is to make an event bubble from a view to a route so that we can toggle a property located in a controller somewhere in the app. Also, here we are using aView instead of aComponent (remember that, under the hood, a component is an isolated view).
- JavaScript tab. The
modalViewis the defaultlayoutfor all of our modals. It has two methods,showModalandhideModal. TheshowModalmethod is called with anactionthat bubbles up, first through controller, then through routes, until it finds a correspondingshowModalaction. We’ve storedshowModalin the highest route possible, theapplicationRoute. Its only goal is to set themodalVisibleproperty inside the controller that was passed in theaction’s second argument. And yes, creating a property at the same time as we set it is possible. - HTML tab. Each modal has its own template, and we’ve used the convenient
{{#view App.ModalView}}…{{/view}}block tags to encapsulate them inmodal_layout. The modal’s controllers are not even declared because Ember.js has them in memory. Note that the{{render}}helper takes parameters, which are the template’s name and a generated controller for this template. So, here we are calling amodal01template and amodal01controller (auto-generated). - CSS tab. For the purpose of this example, modals need to be present in the DOM. This can feel like a constraint, but the main benefit is the reduced paint cost; otherwise, Ember has to inject and remove them every time we call them. The second benefit is CSS transitions. The
shownclass applies two transitions: first, the top position (because the modal is off screen by default), then, with a little delay, it transitions the opacity (which also has areduced paintcost when transitioning). Thehiddenclass does the same in reverse. Obviously, you can apply alot of cool transitions to your modals if they stay in the DOM.
The guides have a lot more information aboutevents,event bubbling,layouts and the{{render}} helper tag.
What Is Ember-Data?
Ember-Data is in beta as of the time of writing, so please use it with caution.
It is a library that lets you retrieve records from a server, hold them in a store, update them in the browser and, finally, save them back to the server. The store may be configured with various adapters, depending on your back end. Here’s a diagram of Ember-Data’s architecture.
The Store
The store holds data loaded from the server (i.e. records). Routes and controllers can query the store for records. If a given record is called for the first time, then the store tells the adapter to load it over the network. Then, the store caches it for the next time you ask for it.
Adapters
The application queries the store, and the adapter queries the back end. Each adapter is made for a particular back end. For example, theRESTAdapter deals with JSON APIs, andLSAdapter deals with local storage.
The idea behind Ember-Data is that, if you have to change the back end, then you simply plug another adapter, without having to touch a single line of your application’s code.
FixtureAdapterFixtureAdapteris perfect for testing Ember and Ember-Data. Fixtures are just sample data that you can work with until your app reaches the production phase. We went over how to configure it in an earlier part of this article.RESTAdapterRESTAdapteris the default adapter in Ember-Data. It lets you perform GET, PUT, POST and DELETE requests over a REST API. It also requires somespecific JSON conventions in return. EnablingRESTAdapterlooks like this:App.ApplicationAdapter = DS.RESTAdapter.extend({ host: 'https://your.api.com' });There’s a lot more to discover about
RESTAdapterin the guides.Custom adapter. You could use something other than the two default adapters (
FixtureAdapterandRESTAdapter). A bunch of them are on GitHub. For instance, there’s the LocalStorage Adapter, which is demonstrated in the guides’ sampleTodos app and is also the one I use in the demo.
What About Not Using Ember-Data?
In this article, I’ve chosen to cover Ember-Data because it’s almost stable and is probably one of the coolest thing happening these days in the JavaScript world. But perhaps you’re wondering whether getting rid of it is possible. The answer is yes! In fact, using Ember.js without Ember-Data is pretty easy.
There are two ways to do it.
You could use another library for your model’s retrieval and persistence. Ember-Model, Ember-Resource, Ember-Restless and the recent EPF are good alternatives. EmberWatch has written a great little article that sums up “Alternatives to Ember Data.”
The other way would be to not rely on a library, in which case you would have to implement methods to retrieve models with AJAX calls. “Ember Without Ember Data,” by Robin Ward (the guy behind Discourse), is a great read. “Getting Into Ember.js, Part 3” by Rey Bango on Nettuts+ deals specifically with models.
For instance, here’s a static method withreopenClass on a model:
/* /models/user.js*/// our own findStuff method inside the User modelApp.User.reopenClass({ findStuff: function(){ // use regular AJAX / Promises calls return $.getJSON("https://your.api.com/api").then(function(response) { var users = []; // creates new Ember objects and store them into the users Array response.users.forEach(function(user){ users.push( App.User.create(user) ); }); // finally returns the array full of Ember Objects return users; }); }});You would use your findStuff method in your routes’ model hook:
/* /routes/usersRoute.js*/App.UsersRoute = Em.Route.extend({ model: function(){ return App.User.findStuff(); }});What Is Handlebars Template Precompiling?
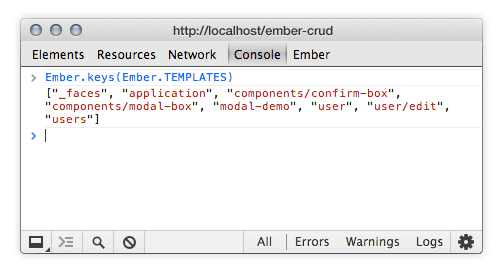
Basically, template precompiling entails grabbing all Handlebars templates, transposing them into JavaScript strings, and then storing them inEmber.TEMPLATES. It also entails an additional JavaScript file to load in your page, which will contain the JavaScript-compiled versions of all of your Handlebars templates.
For very simple apps, precompiling can be avoided. But if you have too many<script type="text/x-handlebars"> templates in your main HTML file, then precompiling will help to organize your code.
Furthermore, precompiling your templates will enable you to use the runtime version of Handlebars, which is lighter than the regular one. You can find both the runtime and standard versions on theHandlebars website.
Template Naming Conventions
Partials have to begin with a_. So, you will have to declare a_yourpartial.hbs file or, if you don’t precompile your templates, a<script type="text/x-handlebars"> tag.
Components have to begin withcomponents/. So, you will have to store them in acomponents/ folder or, if you don’t precompile templates, declare a<script type="text/x-handlebars"> tag. Component names are hyphenated.
Otherwise, views have atemplateName property in which you can specify which template to associate with the view. Take this declaration of a template:
<script type="text/x-handlebars"> Some template</script>You can associate it with a particular view:
App.SomeView = Em.View.extend({ templateName: 'folder/some-template'});Precompiling With Grunt
If you useGrunt, then you probably use it for other building-related tasks (concatenation, compression, that kind of stuff), in which case you should be familiar with thepackage.json file, which comes with Node.js and Node Packaged Modules. I’ll assume you are already familiar with Grunt.
As of the time of writing, two plugins are available for Grunt to transpose your.hbs files to atemplates.js file:grunt-ember-handlebars andgrunt-ember-templates. The latter seems a bit more up to date than the former.
I’ve made a Gist for each of them, in case you need help with configuration:
grunt-ember-handlebars(see the Gist),grunt-ember-templates(see the Gist).
Once it’s configured, you should be able to rungrunt in a command-line editor, which should produce thetemplates.js file. Load it intoindex.html (afterember.js), and then go into the browser’s console and typeEm.TEMPLATES. You should see a hash containing all of the compiled templates.
Be aware that Ember.js doesn’t need the template file’s complete path, nor the file’s extension. In other words, the template’s name should beusers/create, not/assets/js/templates/users/create.hbs.
Both plugins have options to handle this. Simply refer to the respective guide, or look at the Gists linked to above. You should end up with something like this:
And this is exactly what we need to make everything work as intended. It’s all you need to know about precompiling with Grunt.
Precompiling With Rails
Precompiling with Rails is surely the easiest way to do it. TheEmber-Rails gem handles pretty much everything for you. Italmost works out of the box. Carefully follow the installation instructions in thereadme file on GitHub, and you should be all good. Right now, in my humble opinion, Rails has the best Ember and Handlebars integration available.
Tools, Tips And Resources
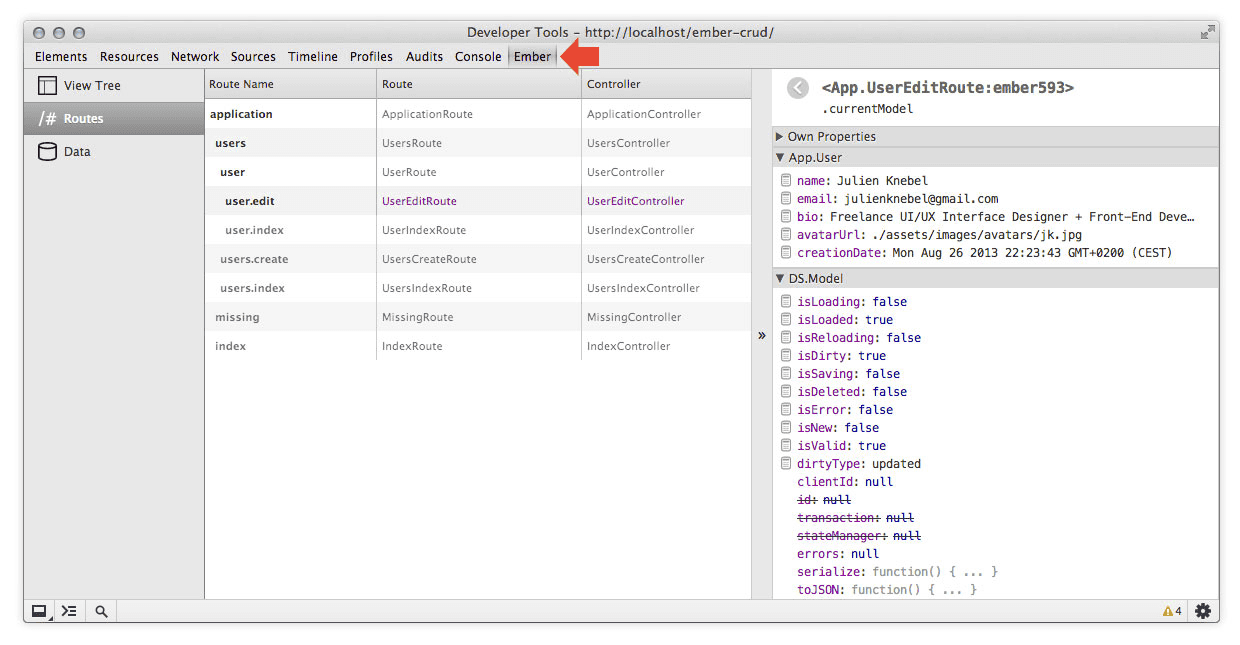
Chrome Ember Extension
Ember Extension is a very convenient Chrome extension. Once installed, an “Ember” tab will appear near the “Console” tab. Then, you can navigate through controllers, routes and views. And the “Data” tab will greatly help you to explore your records if you are using Ember-Data.
Ember App Kit
Maintained by the Ember team, theEmber App Kit lets you easily scaffold Ember JS apps. It containsGrunt for compiling assets,JSHint,QUnit, theKharma test runner,Bower andES6 Modules support.
Ember Tools
This GitHub project,Ember Tools, is a basic command-line interface for creating and scaffolding Ember apps. Take a minute to watch the animated GIF in thereadme file, and you’ll see why it’s so cool.
Development and Minified Version
Always use the development build when developing because it contains a lot of comments, a unit-testing package and a ton of helpful error messages, all of which has been removed in the minified build. Find links to both in the builds section of theEmber.js website.
Debugging Tips
Ember JS usually gives you cool human-readable errors in the browser’s console (remember to use the development version). Sometimes, though, figuring out what’s going on is tricky. Some convenient methods are {{log something}} and{{controller}}, which helpfully prints the currentcontroller for the template to which you’ve added this helper.
Or you could log each Router transition like so:
window.App = Ember.Application.create({ LOG_TRANSITIONS: true});The guides have an exhaustive list of these handy little methods.
Properly Comment Your Handlebars
This one can be frustrating. Never ever comment a Handlebars tag with a regular HTML comment. If you do, you’ll completely break the app, without getting a clue about what’s happening.
// never do this<!-- {{foo}} -->// instead do this{{!foo}}Conclusion
I hope thislong article has given you a better understanding of this awesome framework. But the truth is, we’ve only scratched the surface. There’s so much more to cover. For instance, we have the router and its asynchronous nature, which resolves model requests with promises (so that you can easily implement loading spinners). There is also the object model, with its class and instances inheritance, mixins, observers, filters, macros, collectionViews, components, dependencies managed between controllers, and testing package. And so much more!
Obviously, I couldn’t cover everything. Fortunately, the guides will take you through all of these topics very well.
Happy Ember.js coding, folks!
Resources
- Ember.js Guides The best place to learn Ember
- Ember.js Cookbook A new section of the guides that solves very specific use cases
- EmberWatch Aggregates all important resources out there
- Ember Weekly Perfect for keeping up to date
- Ember.js Discussion Forum Where discussion happens (and it’s made with Ember.js)
Acknowledgments
Huge thanks toMathieu Breton andPhilippe Castelli, who both taught me everything they know about Ember.js while I was learning it. Also, a big thank you toTom Dale, who helped me to revise this very long article.


